Universal Block Settings
This article describes the settings and behaviors shared by all Blocks.
Node Menu
When a Block is used inside a workflow, it appears there as a Node, and the Node menu becomes available.
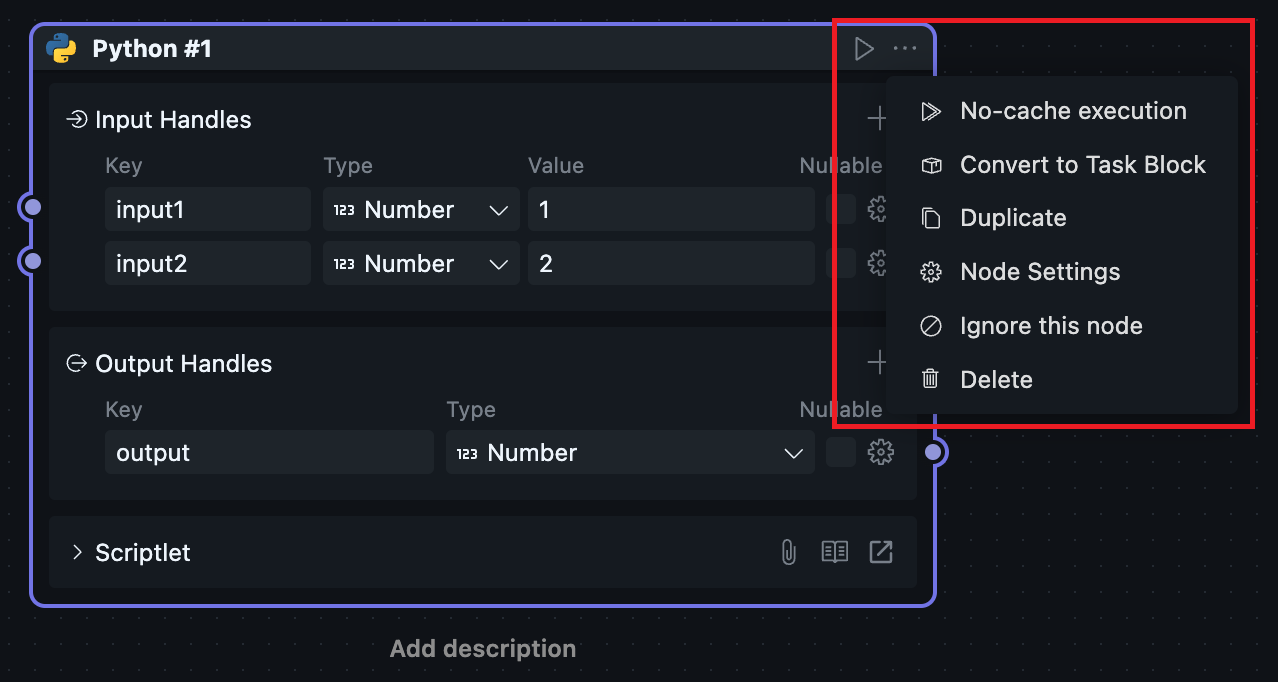
Execution
The Node menu provides two execution methods. The main difference is whether the current run reuses cache from a previous successful run. Both methods start from the necessary upstream graph and execute up to the current Node.
The difference is whether to use the results from the previous Node execution as input for downstream Nodes.
Cache Mechanism
Some Blocks can be expensive or slow to execute, so rerunning them every time would be wasteful. That is why OOMOL provides a Node-level cache mechanism.
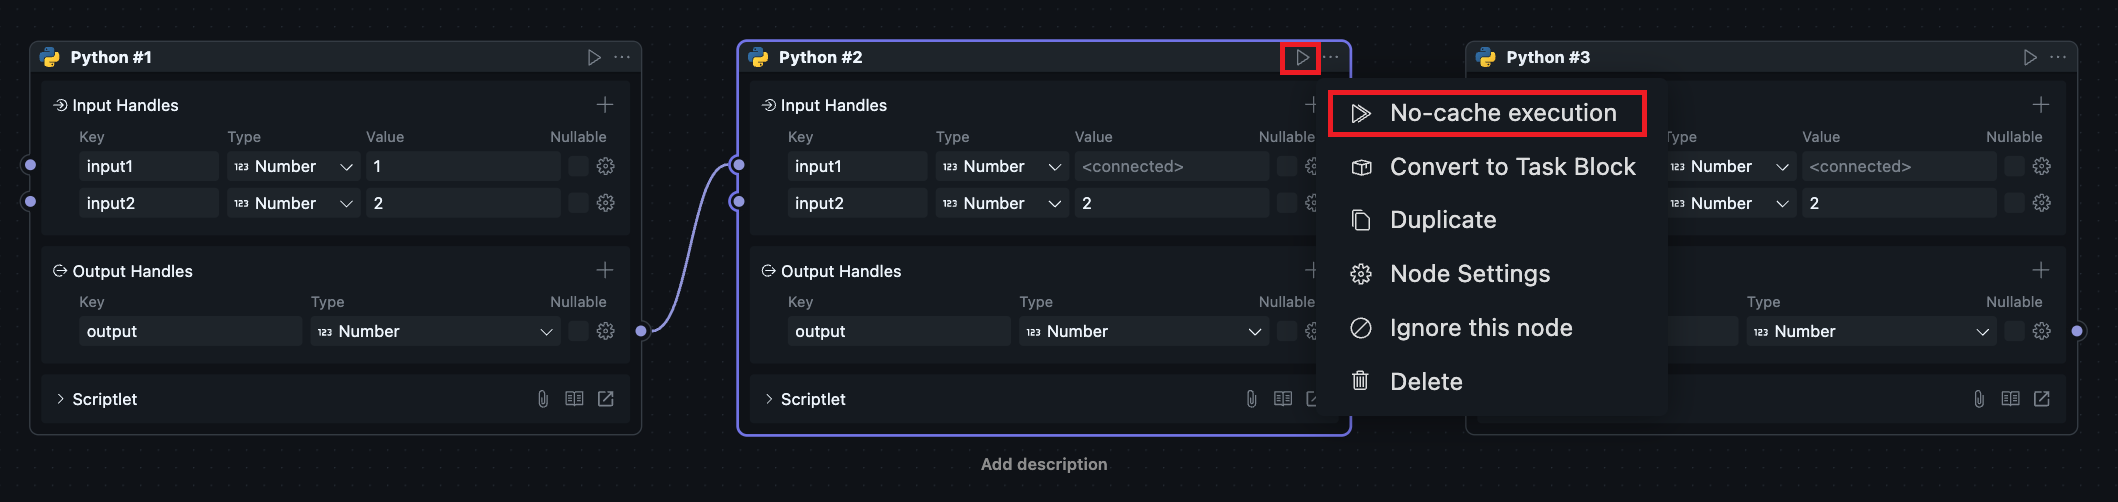
After any Node executes successfully, except for Handles of type variable, all Node output Handles will retain the output values from the previous execution. This way, when downstream Nodes choose to execute, they will automatically use cached values without triggering upstream Node execution.
Users can also choose "Clear cache and execute", which skips cache reuse for the current run, triggers upstream execution again, and refreshes the output values.
If the current Node's upstream output Handle has variable types, running will always trigger upstream Node execution regardless, because we cannot cache variables in the code execution environment.
Duplicate
Duplicate the current Node within the workflow. You can also use shortcuts ctrl + c(Windows) / cmd + c(MacOS) to copy, ctrl + v(Windows) / cmd + v(MacOS) to paste.
Using shortcuts allows copying and pasting across different workflows.
Duplicate behavior differs for scriptlet Blocks and shared Blocks:
-
Scriptlet Blocks
Duplicating will create a new Block in the workflow, including the Block's configuration files and code, resulting in two independent scriptlet Blocks that don't affect each other.
-
Shared Blocks
Duplicating only creates a reference to the shared Block in the workflow as a new Node. Both Nodes point to the same Block with the same code, so configuring the shared Block will affect both Nodes simultaneously.
Node Settings
Node Settings only affect the current workflow. Each Node's settings are independent and do not affect other Nodes.
Metadata
For icons and titles, you can configure them in the menu or in the Node header. Double-click the title to enter a new title.
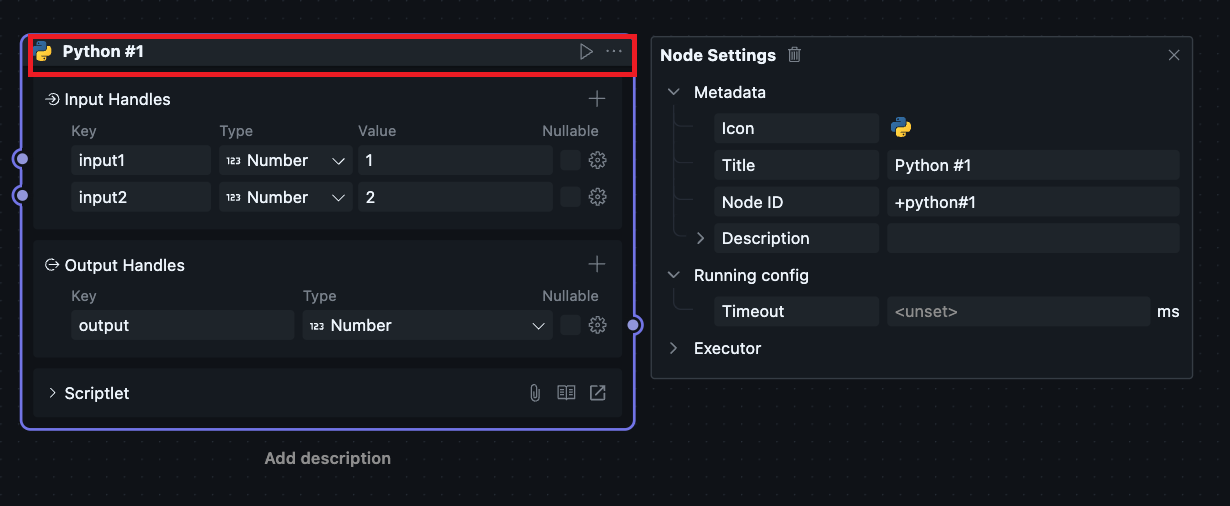
Node ID should be unique within the current workflow.
Node description can be entered in the configuration menu, or you can select the Node and double-click "Add description" below to enter the Node description.
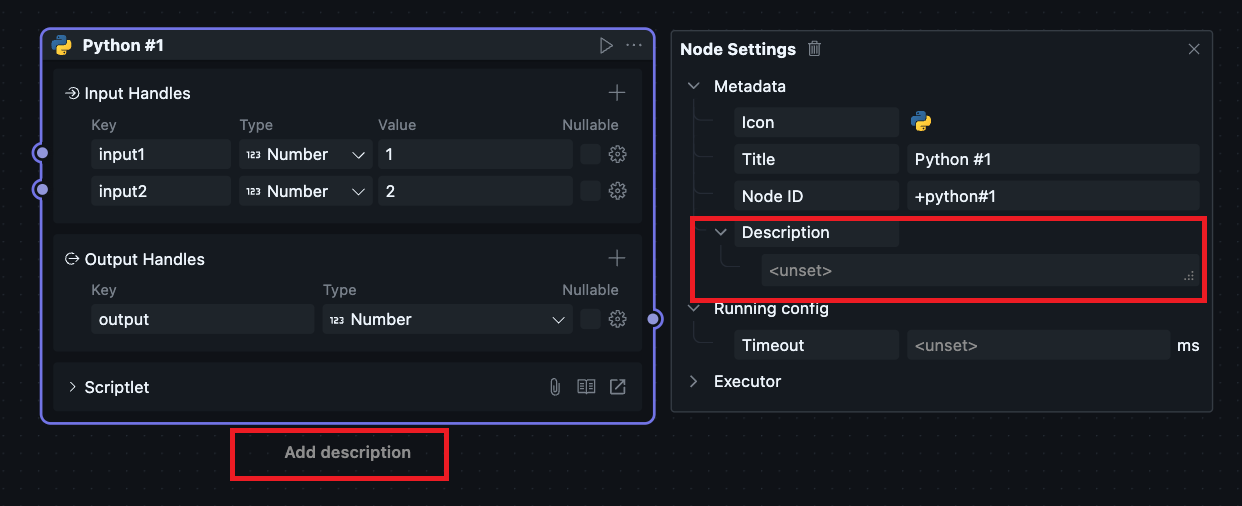
Timeout
Used to limit the maximum runtime of the current Node. If not set, there is no timeout by default.
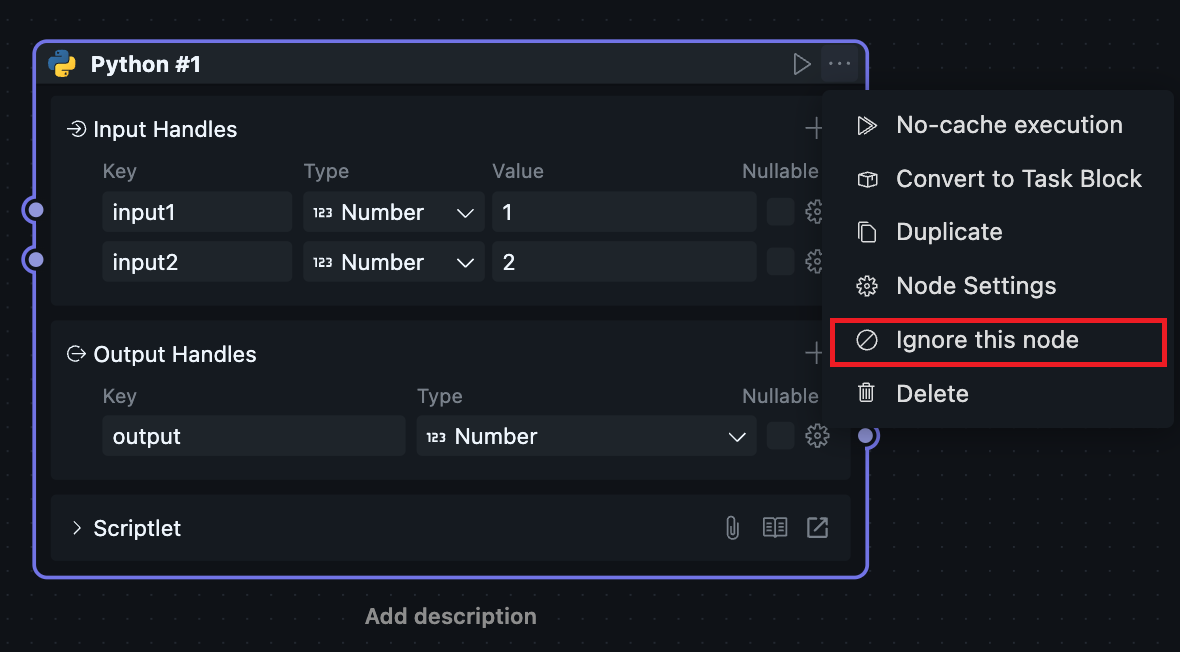
Ignore
Click "Ignore this Node" to set the Node to ignore status. When running the current flow, this Node and subsequent Nodes will be skipped.
The ignore function can be used to debug workflow execution under different execution paths, for example:
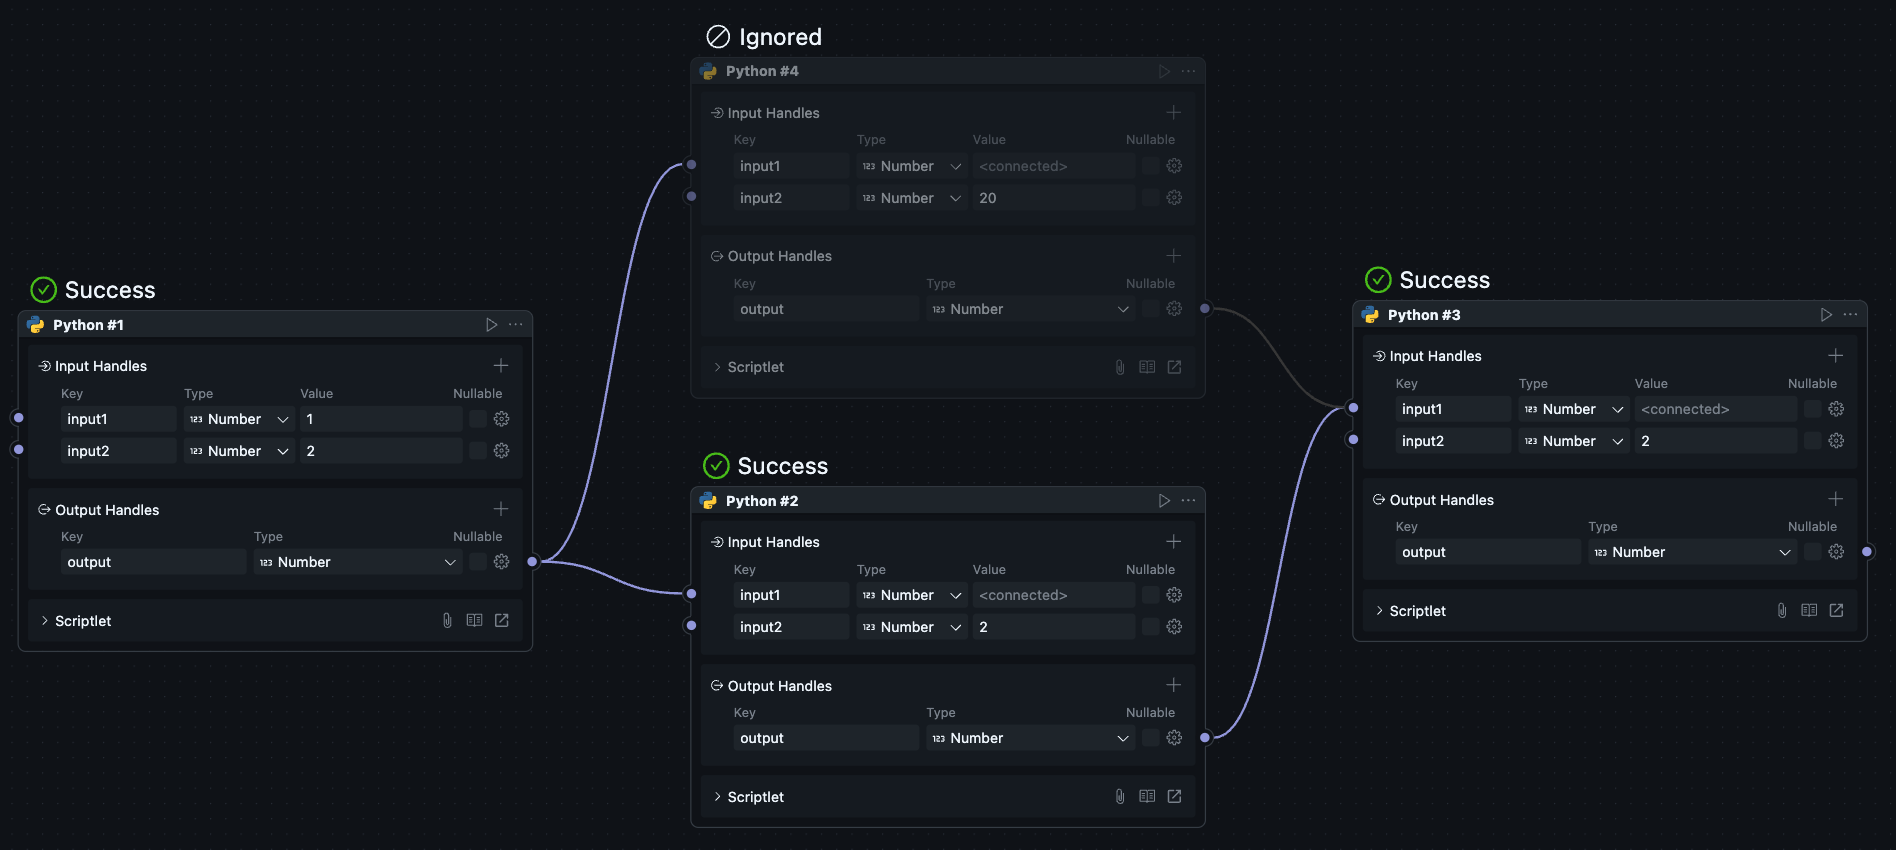
Users can toggle the ignore status of Nodes to restrict the workflow to run under certain conditions.
Delete
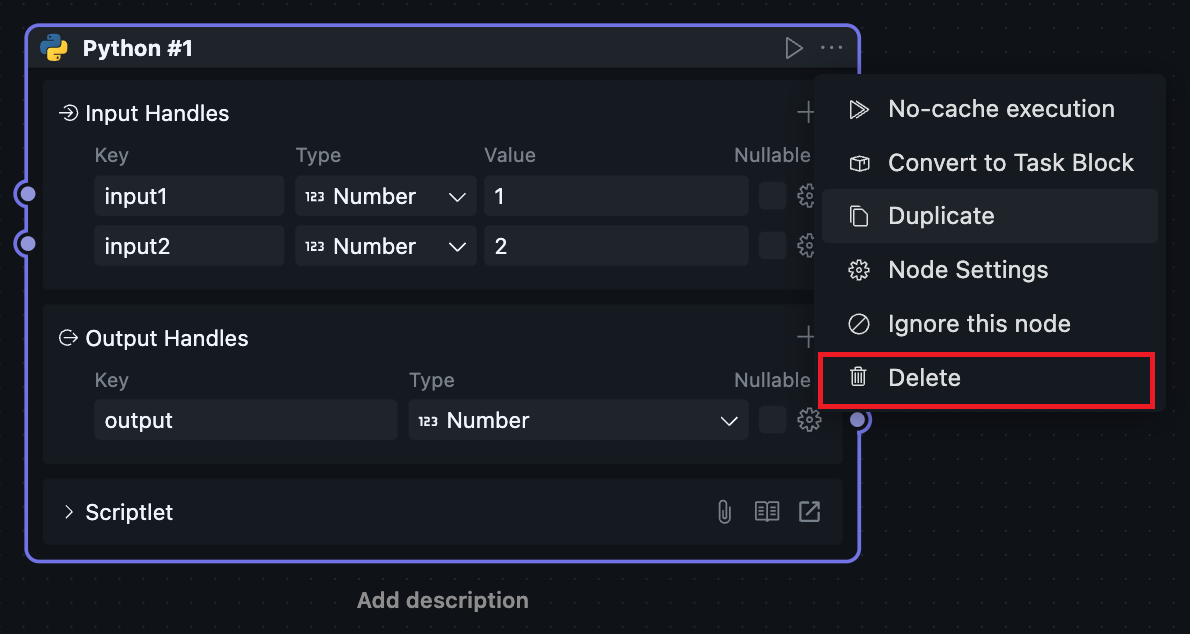
The delete function can remove the current Node. You can use the menu button or shortcut ctrl + shift + delete(Windows) / cmd + shift + delete(MacOS). This function has different behavioral logic for scriptlet Blocks and shared Blocks:
- Scriptlet Blocks
Will delete the Node and the scriptlet Block, including Block configuration and code files.
- Shared Blocks
Will only delete the Node within the workflow; the shared Block itself will not be deleted.
Block Configuration
Since scriptlet Blocks can only be created and used within workflows, scriptlet Blocks have both Node and Block attributes, causing the Node configuration and Block configuration of scriptlets to be merged together.
Block configuration has different entry points for scriptlet Blocks and shared Blocks, but the effects are the same.
Universal Block configuration includes executor and Handle configuration.
Executor
The executor is the runtime engine that loads and executes Block code. It acts as the bridge between OOMOL's workflow orchestration system and the actual code execution environment.
Each code language environment has a corresponding executor implementation. When configuring a Block, you specify which executor to use and how it should invoke your code.
For a comprehensive understanding of executors, see Executor Concepts.

Name
Currently, executors are implemented internally by the oomol team and support Python and Node.js runtime environments, so there are two corresponding options.
Python Executor:
- Executes Python code in a Python runtime environment
- Default entry function name:
main - Supports standard Python libraries and packages installed via Poetry
- Can pass complex Python objects (DataFrame, pandas instances, etc.) using Variable type Handles
Node.js Executor:
- Executes JavaScript/TypeScript code in a Node.js runtime environment
- Default entry function name:
default export function - Supports npm packages with full TypeScript support
- Can pass complex JavaScript objects using Variable type Handles
Entry
Select the code entry file. The default file is generated when users create scriptlet Blocks. If there are no special requirements, no changes are needed. Users can also specify any file, but must ensure implementation according to the code template, otherwise it won't run properly.
Important considerations:
- The entry file must implement the required function signature with two parameters:
- Input parameters (dictionary/object containing Handle values)
- Context object (providing runtime utilities)
- The function must return output values as a dictionary/object
- For async operations in Node.js, return a Promise
Refer to Node.js template and Python template for implementation details.
Function
Specify the code entry method name. Default is the main method of the entry file (Python code) or default export function (Node.js code). You can specify custom methods if needed, but must include method parameters from the template code.
Custom function example:
For Python:
def custom_function_name(params: dict, context: Context):
    # Your implementation
    return {"output": result}
For Node.js:
export async function customFunctionName(params, context) {
    // Your implementation
    return { output: result };
}
Spawn
The Spawn setting controls whether a Block runs in an independent process or shares a process with adjacent Blocks.
Automatic Optimization:
When oomol studio runs workflows, it performs automatic detection. If upstream and downstream Blocks meet the following conditions, the internal scheduler will place both Block codes in the same process for invocation:
- Implemented in the same code language (both Python or both Node.js)
- For shared Blocks, they must also belong to the same package
Benefits of same-process execution:
- Resource efficiency: Reduces memory overhead and eliminates process startup time
- Direct variable passing: Upstream and downstream Blocks can pass code variables directly using Variable type Handles, eliminating serialization and deserialization steps
- Performance improvement: Eliminates inter-process communication overhead
When to enable Spawn (independent process):
You may want to manually enable independent process execution in these scenarios:
- Isolation: The Block contains potentially unstable code that might crash
- Memory management: The Block performs memory-intensive operations that should be isolated
- Resource limits: You need strict resource limits for this specific Block
- Debugging: You want to debug this Block in isolation from others
- Concurrency: The Block uses threading or async operations that might interfere with other Blocks
Performance implications:
- Same process: Fastest execution, can use Variable Handles, shared memory
- Independent process: Slight performance overhead for process creation and inter-process communication, but better isolation and stability
In most cases, you can rely on OOMOL's automatic optimization. Only enable Spawn if you have specific requirements for isolation or resource management.
For more details on how executors manage processes and data transfer, see Executor Concepts - Process Management.
Handle Configuration
Handle configuration is divided into input Handles and output Handles configuration. Output Handles have the same configuration items as input configuration except they cannot specify Handle values.
Handle
The name of the input or output Handle. Users can specify custom names. When the name is modified, the corresponding input or output parameter types in the code will also be automatically updated.
Nullable
Configure whether this Handle allows passing null (Node.js code) / None (Python code) as values. This option is mainly used to restrict input or output types.
This option affects automatically generated types in code and upstream-downstream connection behavior.
If upstream allows outputting null / None values but downstream doesn't allow it, the connection will error.
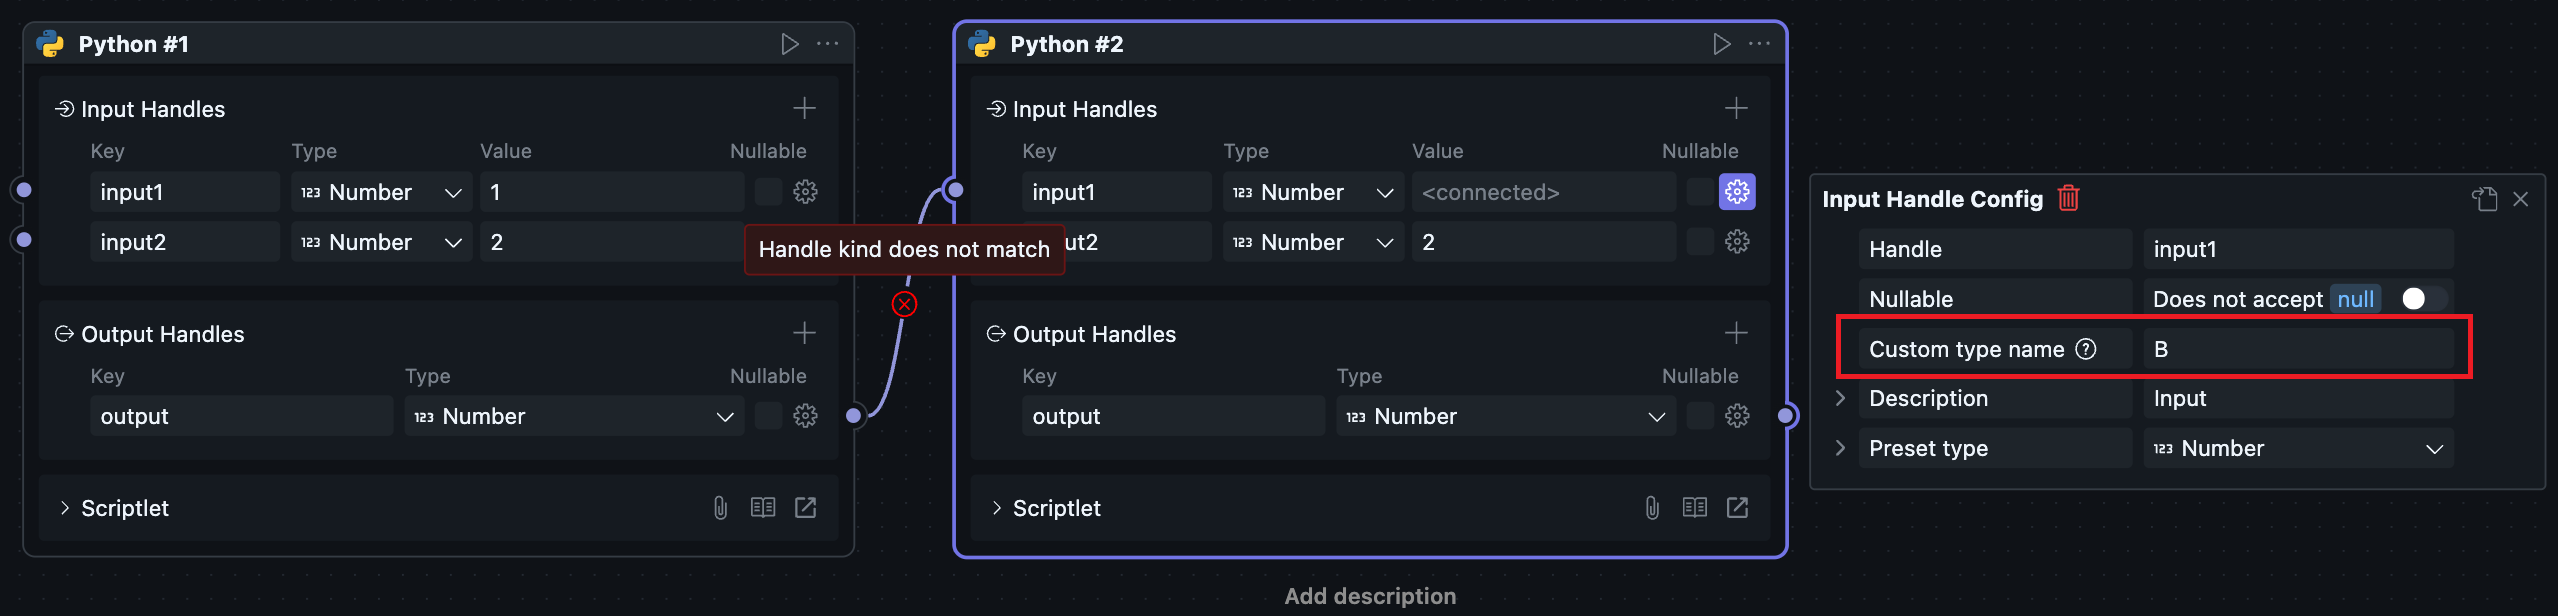
Custom Type Name
Used for users to customize Handle connection validation rules. If users set this value, all other Handle connecting to this Handle must set the same value, otherwise the connection will fail.
Description
Handle descriptions are not displayed and can only be seen in Handle settings.
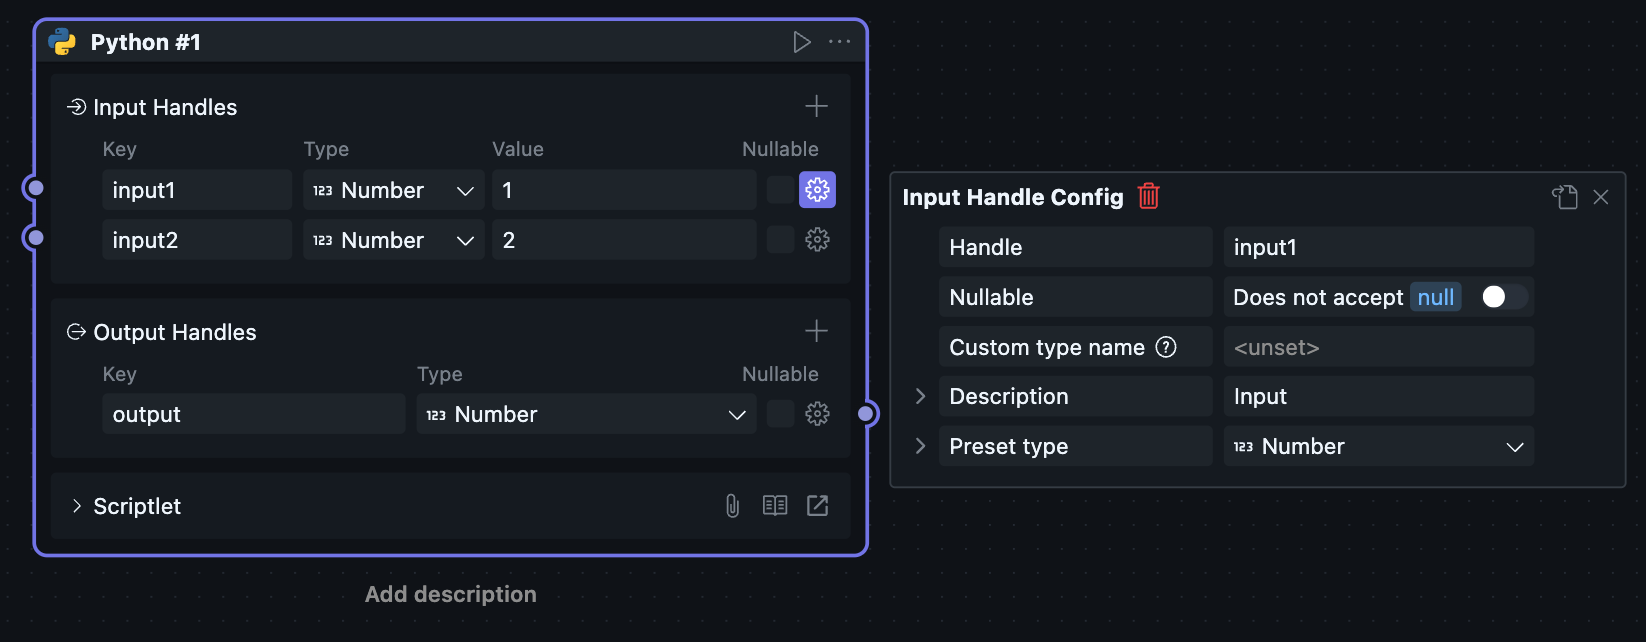
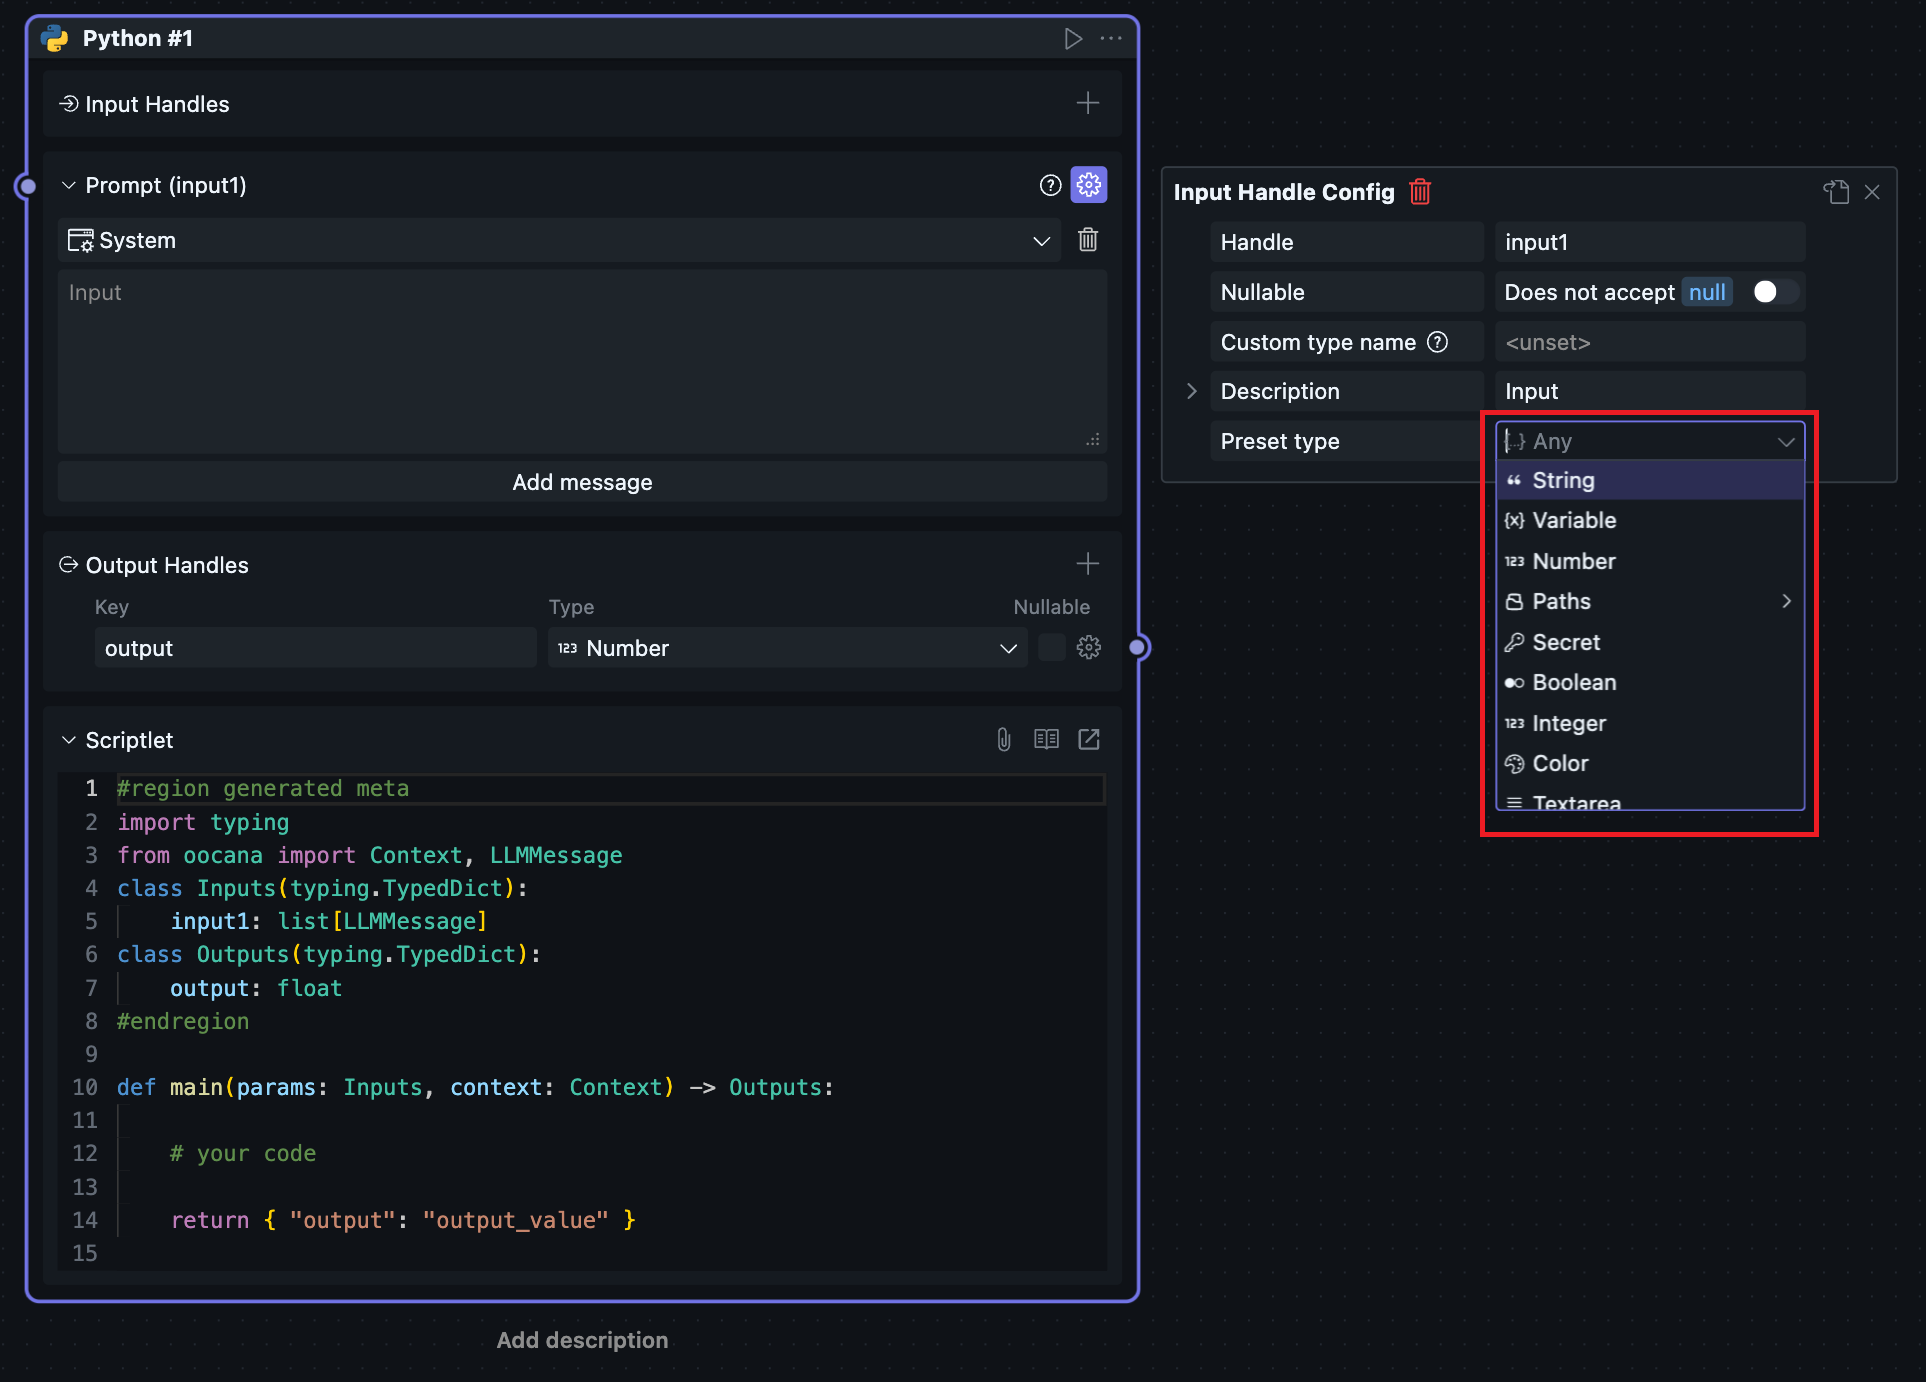
Preset Type
Handle can be configured with preset types to restrict connectable Handles and automatically generate configured types in code.
Selecting different types will change the preset type sub-configuration items and data input fields.
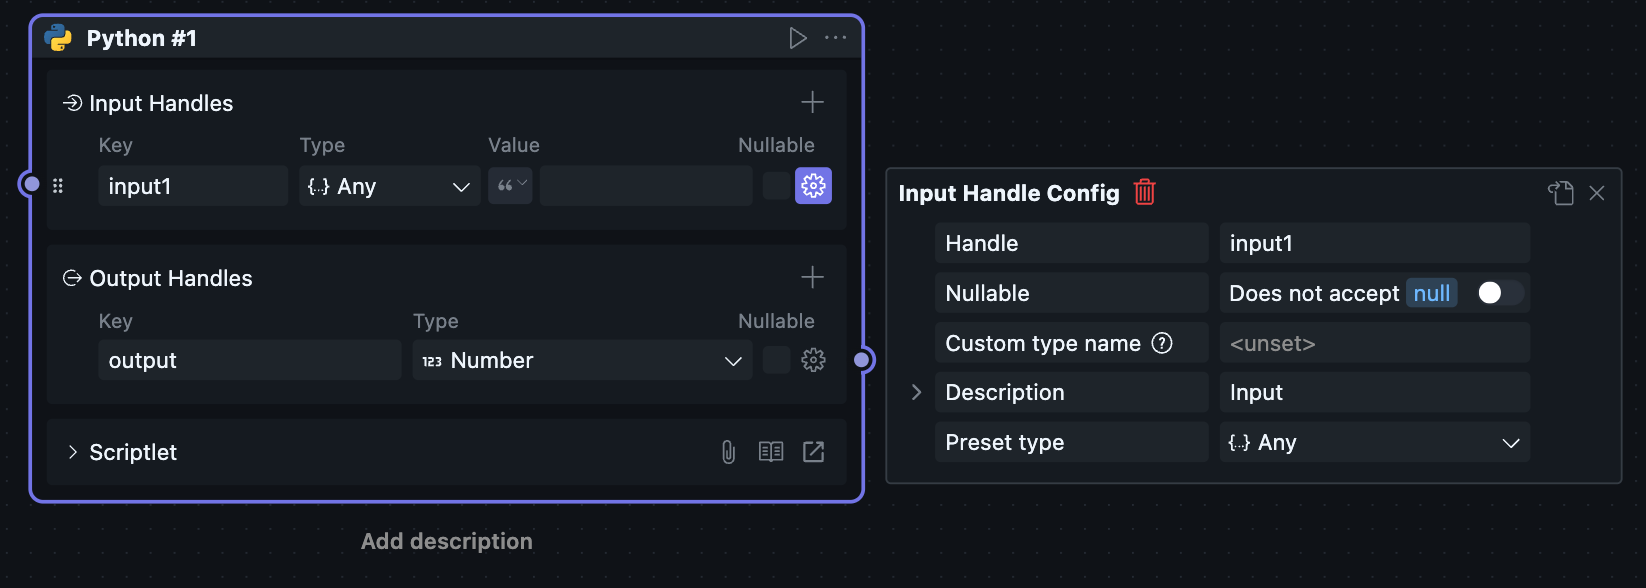
Any
The Handle has no restrictions and can connect to any other Handle.
After selecting Any type, the right data input field will have a data type button for selecting input value types, which doesn't affect Handle type restrictions.
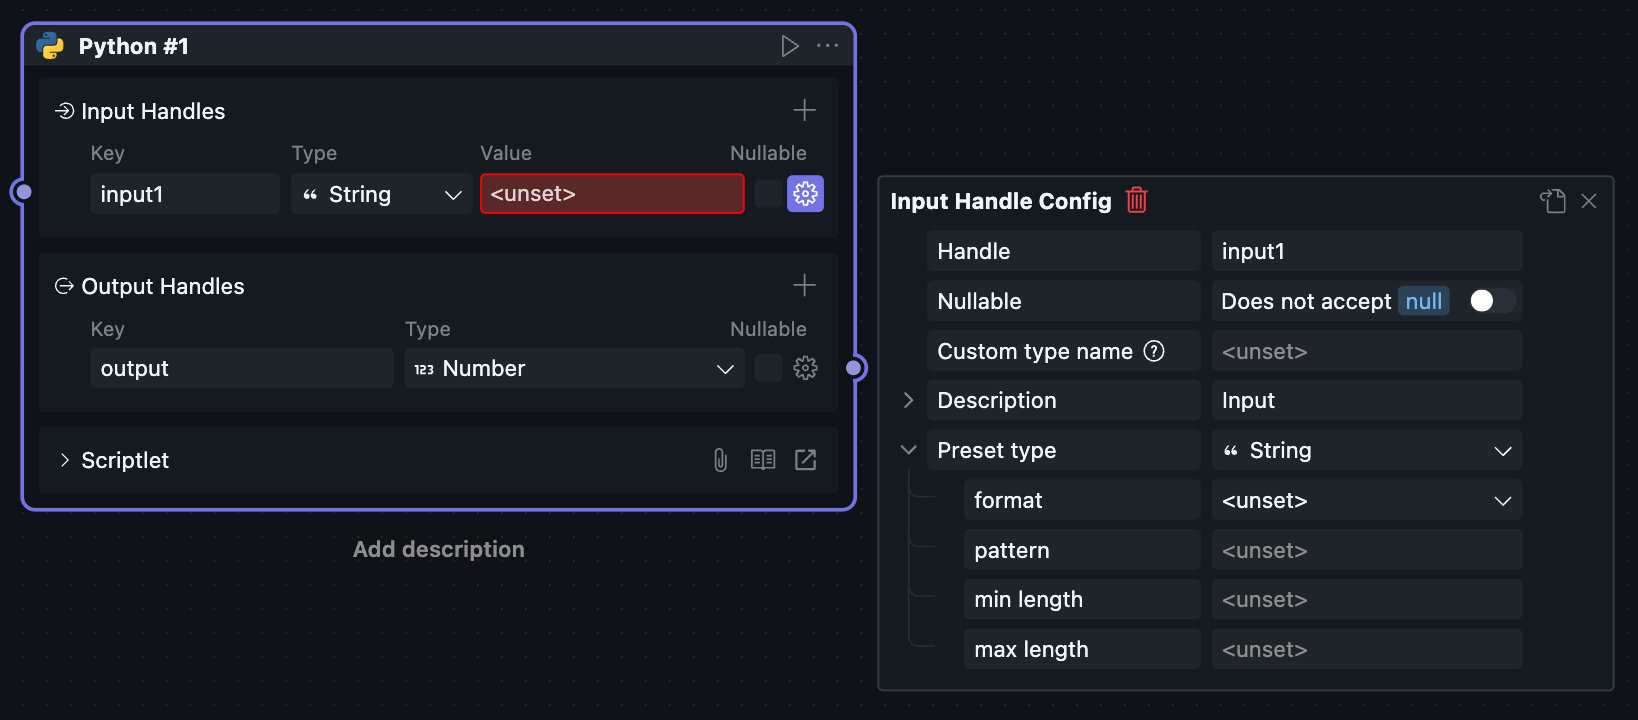
String
Handle value is string type.
Sub-configuration items can configure string format. If a format is selected, rules can be added to values, or you can specify custom regular expressions.
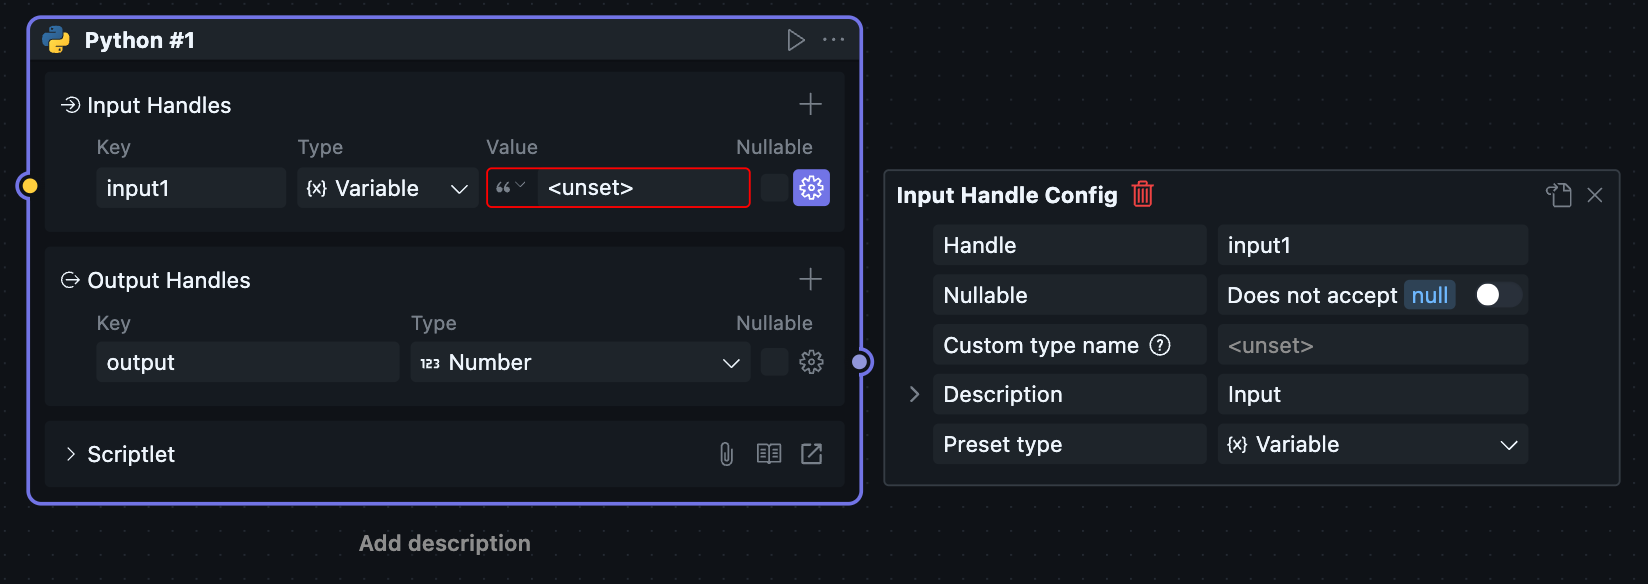
Variable
Handle value is variable type.
For variable type Handles, the connected Handle must be the same language and variable type. If one side is a shared Block, the other side needs to be a Block from the same package.
After setting to variable type, the Handle can pass complex format code objects, such as DataFrame or pandas instances in Python.
In some scenarios where objects cannot be converted to strings or simple types, this method can be used for passing, and passing objects can eliminate serialization and deserialization steps, improving performance.
However, due to connection restrictions, variable type Handles may reduce Block universality, so use with caution.
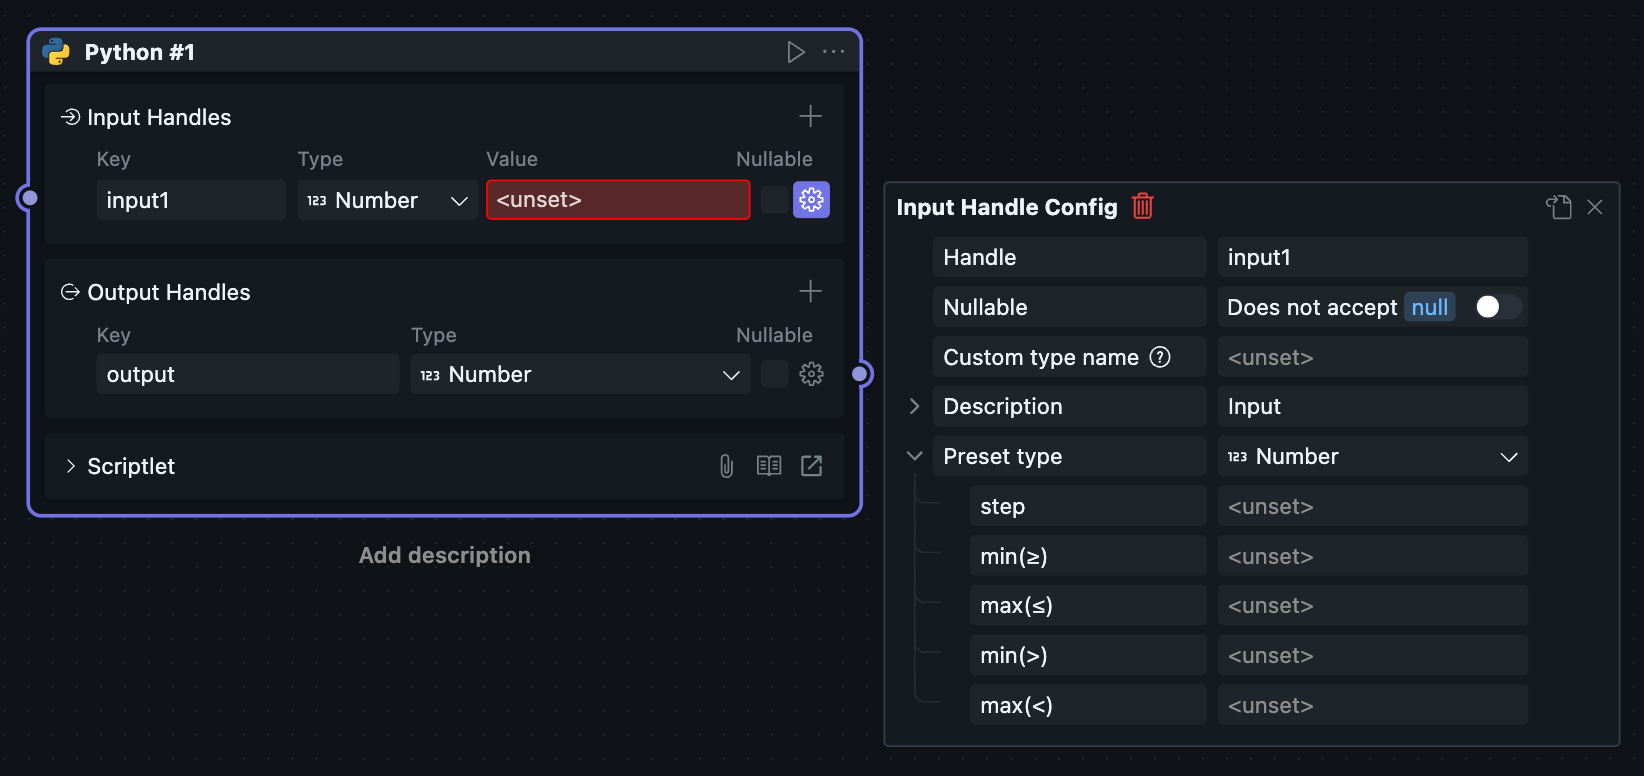
Number
Handle value is number type.
Number type can be floating point or integer, any number type is allowed.
Sub-configuration items can set number range restrictions. In the Block's data control, buttons can adjust numerical values. The step size in sub-configuration items is used to configure the numerical increase or decrease per button click.
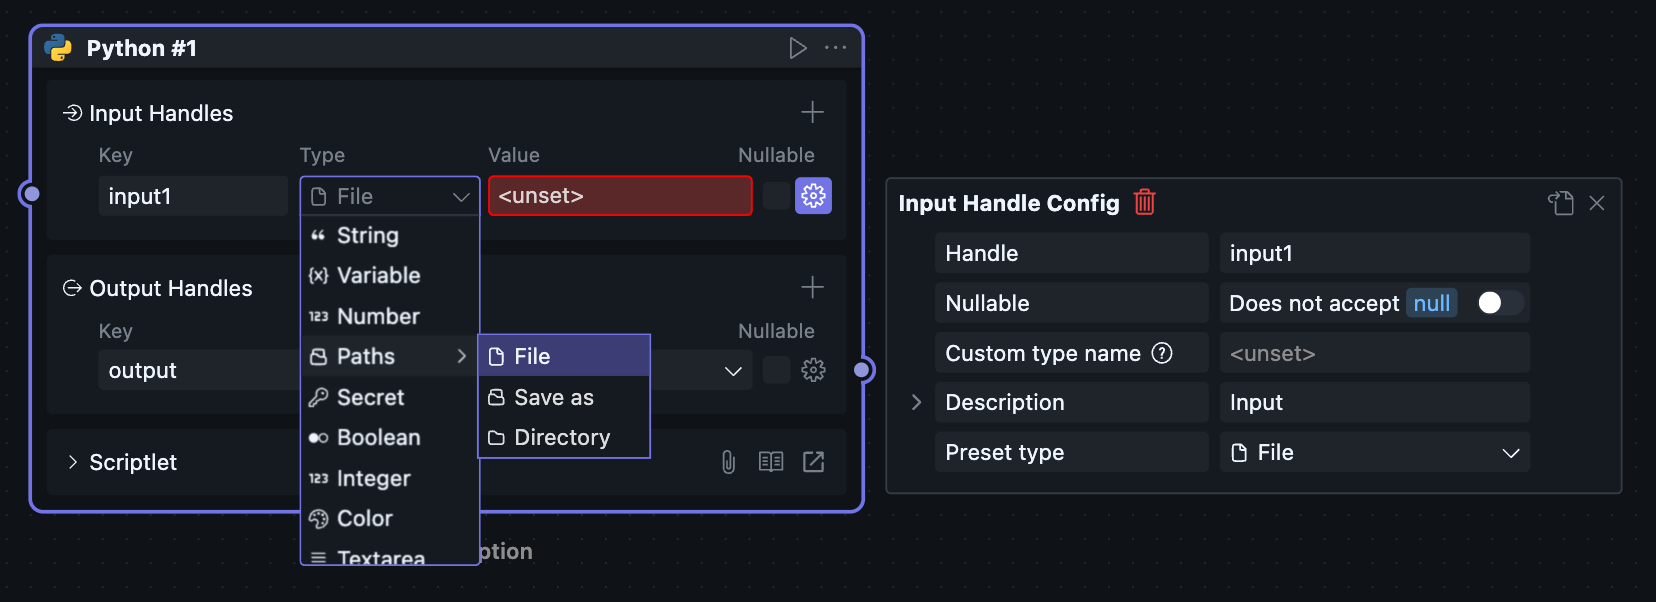
Path
Handle value is address string type, can connect to other string type Handles.
Sub-options include directory / file / save as. The directory / file options require the corresponding address to exist before selection in data controls, while save as option can create non-existent files or folders.
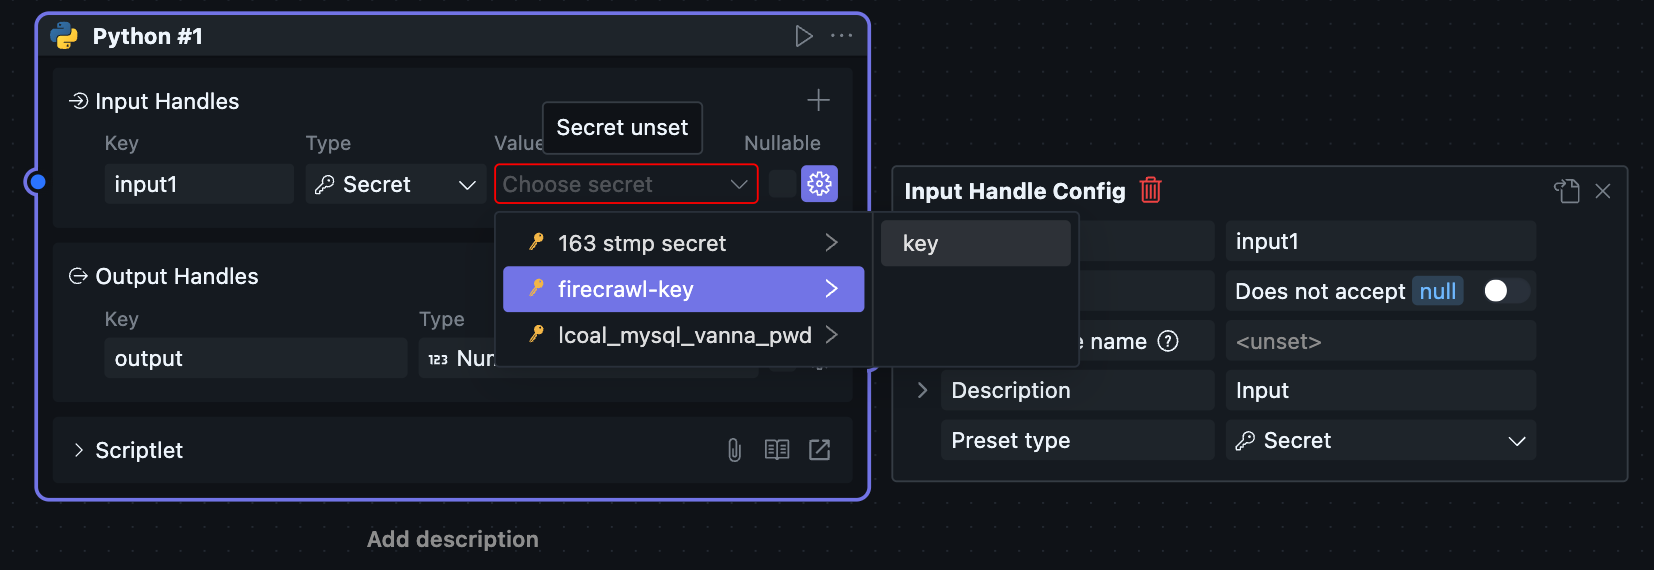
Secret
Handle value is encrypted string type, can connect to other string type Handles.
Considering users may use private strings like API Keys in certain scenarios, we provide secret functionality to prevent user sensitive information leakage.
Users can add secrets in the secret management page on the homepage or secret management page within project interface.
Then they can select and use them in secret type Handles.
If you are authoring Blocks in YAML and need the recommended rules for oomol/secret, OOMOL auth, Fusion-first decisions, or sessionDir fallback, see Secrets, Auth, and Runtime Paths.
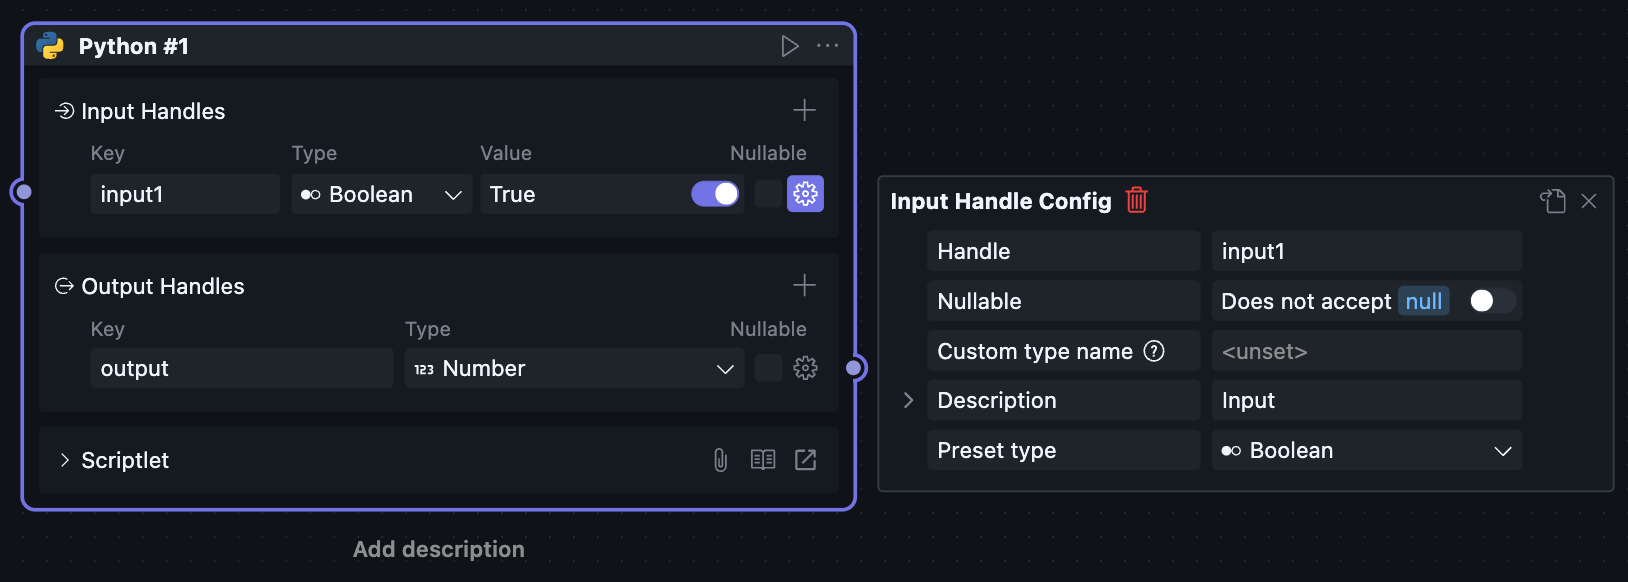
Boolean
Handle value is boolean type, only has True / False two values that can be set, can be toggled with a switch.
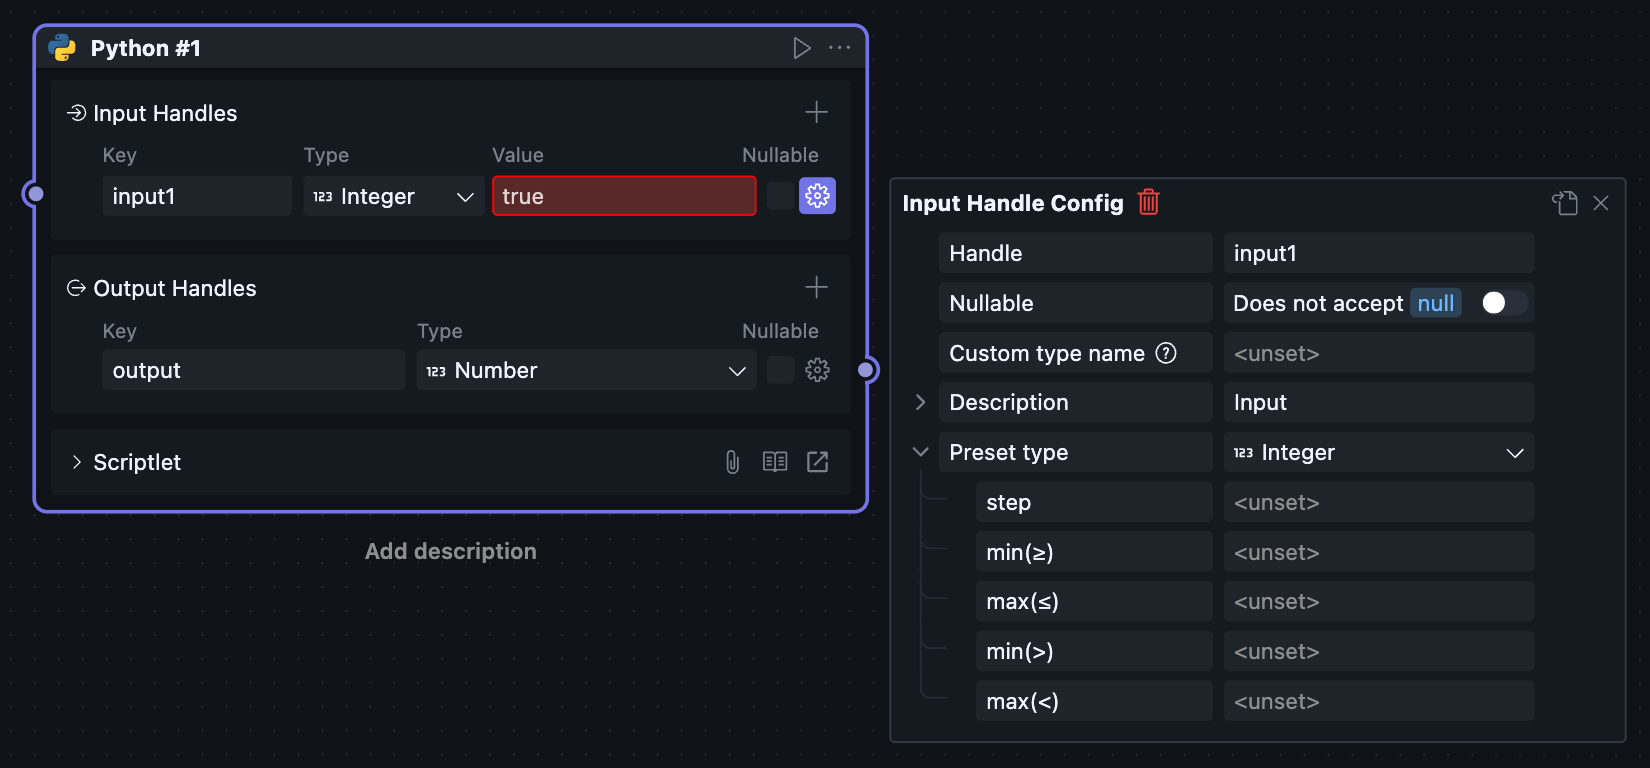
Integer
Handle value is integer number type.
Sub-configuration items are the same as number type, but cannot connect to number type Handles because number type might be floating point.
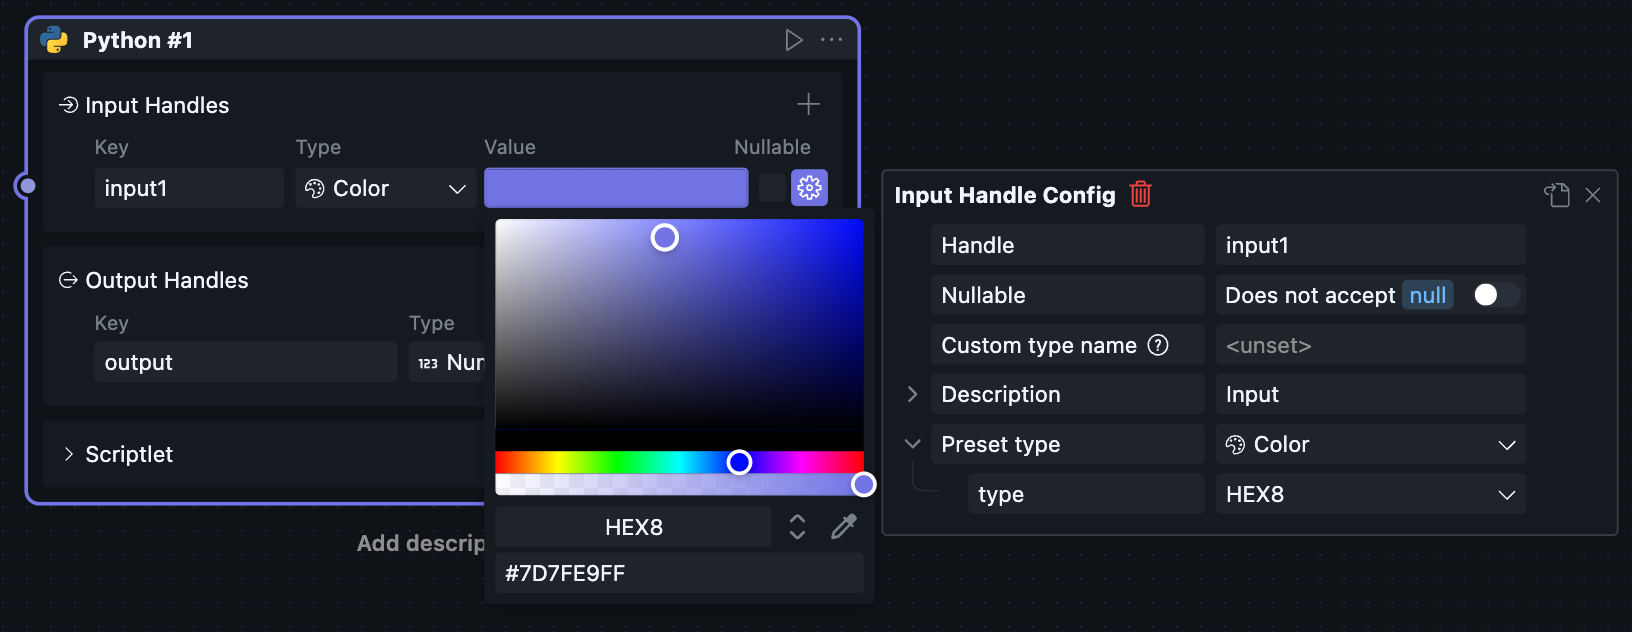
Color
Handle value is color format string type, can connect to other string type Handles.
After selecting color type, you can use color selection controls in the data input field. In sub-configuration items, we provide HEX / HEX8 / HSV / RGB four color format options.
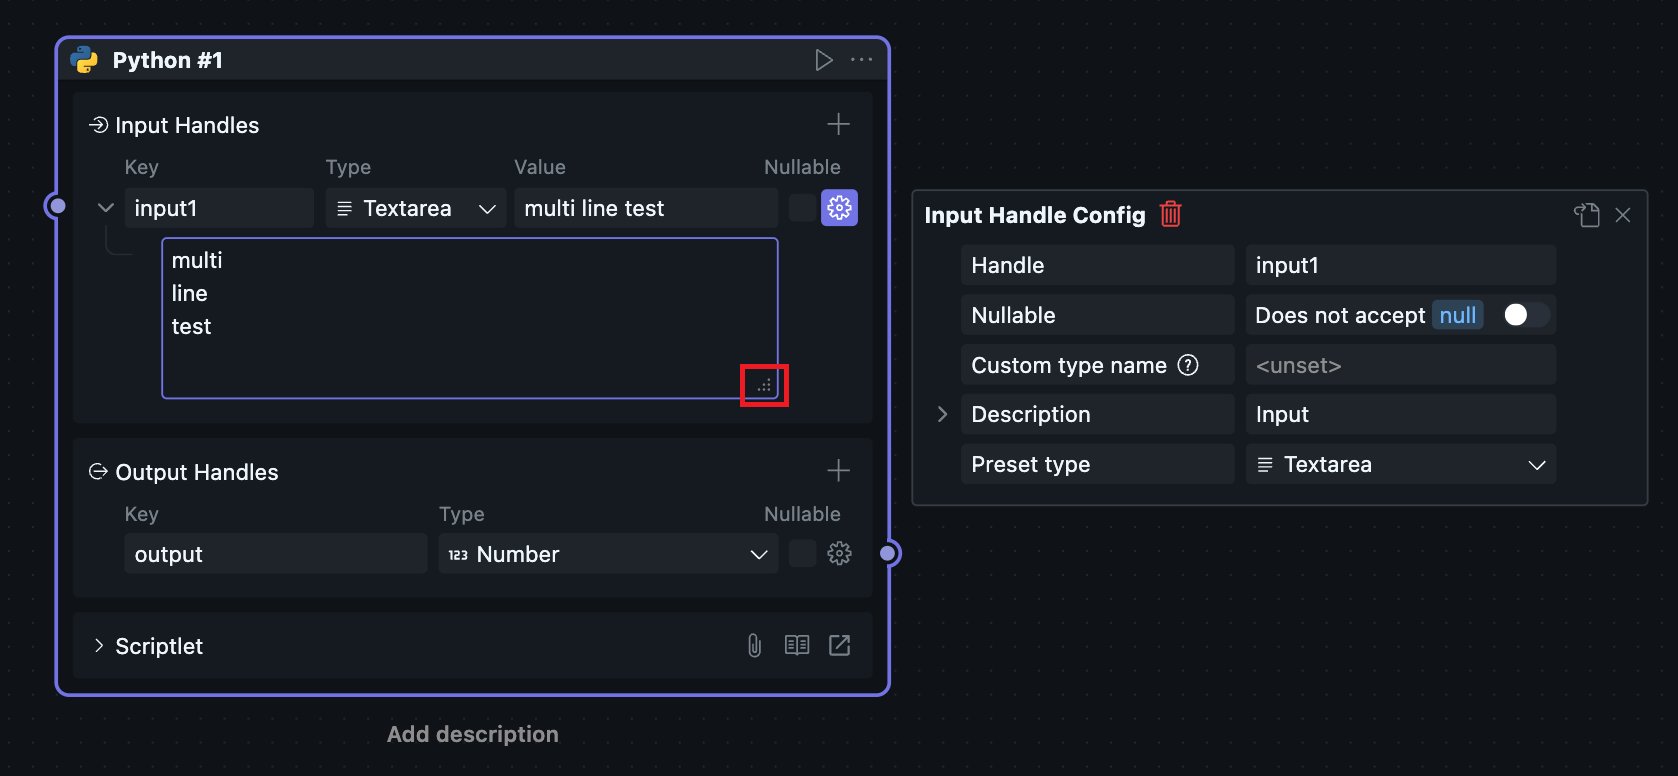
TextArea
Handle value is string type, can connect to other string type Handles.
This type mainly facilitates users entering large text Blocks in data input fields, avoiding text folding that makes observation inconvenient.
Drag the button in the bottom right corner of the text box to change text box height.
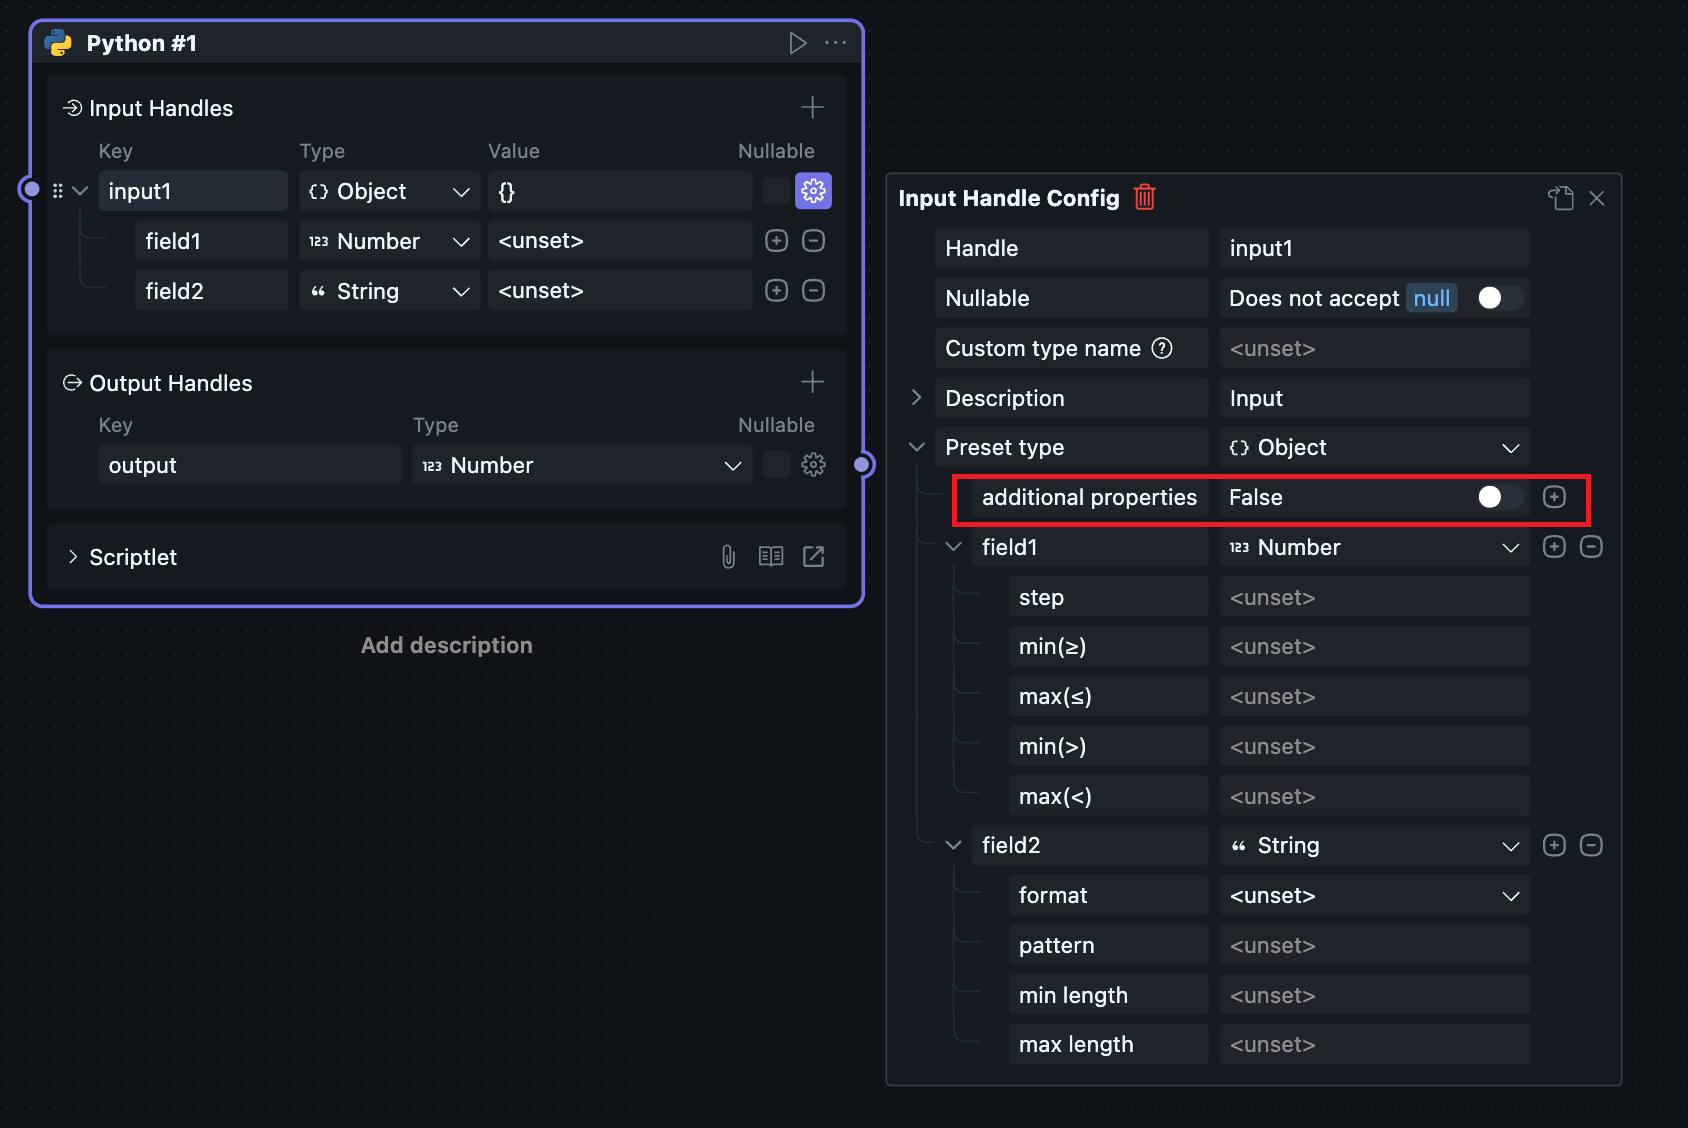
Object
Handle value is object type.
For Node.js, equivalent to plain object; for Python, equivalent to dictionary object.
You can set the type of each object element for object type Handles. The plus and minus buttons on the right can add or delete sub-elements.
In sub-configuration items, there's an additional properties configuration, indicating whether the current Handle allows elements other than those specified in the Handle type. For example:
With additional properties enabled, if the Handle type is:
{
  field1: number,
  field2: string
}
Then passing the value:
{
  field1: 1,
  field2: "2",
  field3: {}
}
is allowed, and field3 as an additional property has no type restrictions.
If additional properties is disabled, no additional properties are allowed.
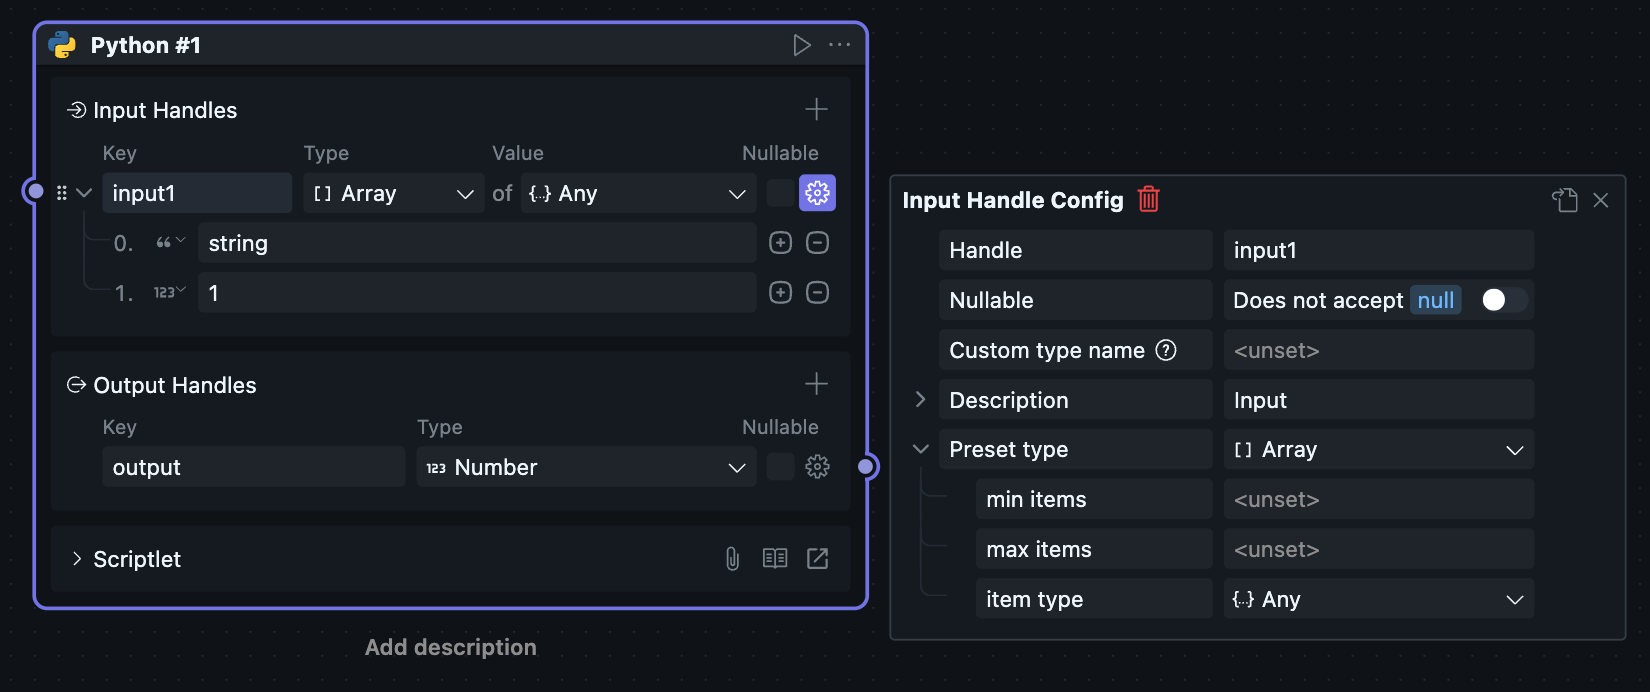
Array
Handle value is array type.
For Node.js, equivalent to array object; for Python, equivalent to list object.
Selecting sub-type in the data input field or selecting Item type in sub-configuration items can constrain all array elements to the same type. If No constraints type is selected, each element in the array can be different types.
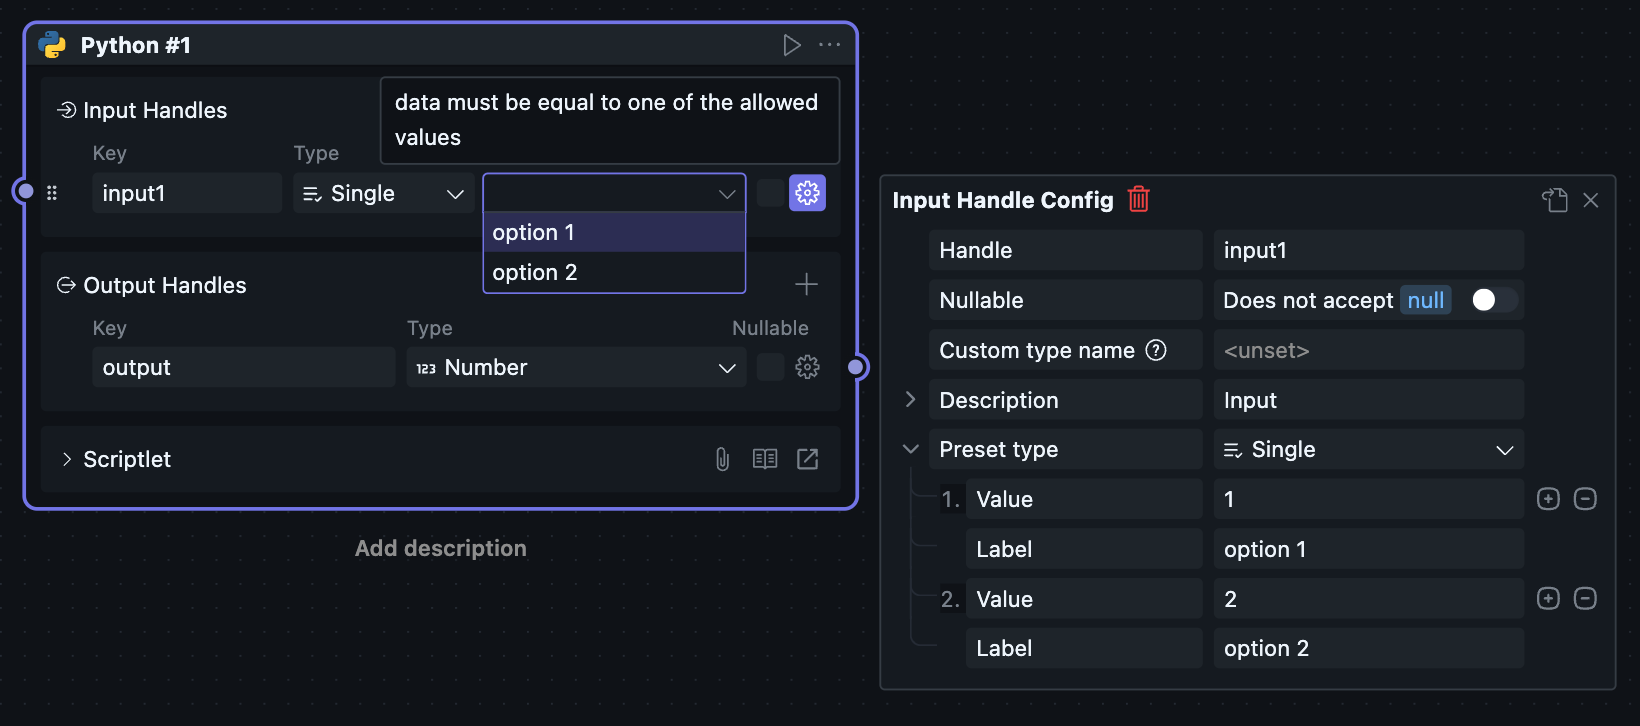
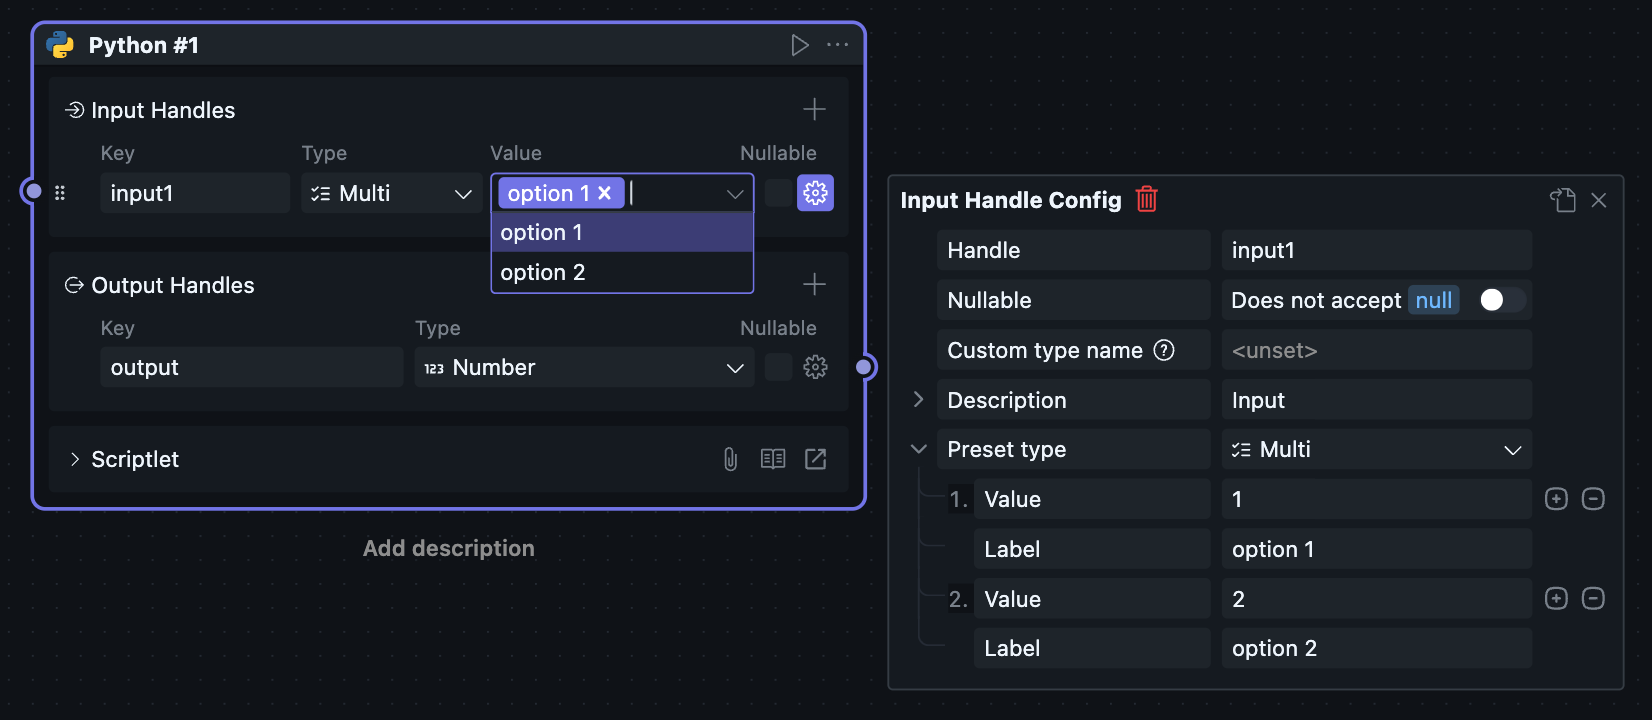
Select
If single select, Handle value is enumerated string type; if multi-select, it's an array type with string type items.
When using select type, you need to configure preset options in sub-configuration items first, then selectable content will appear in the data input field.
Single Select
Multi-Select
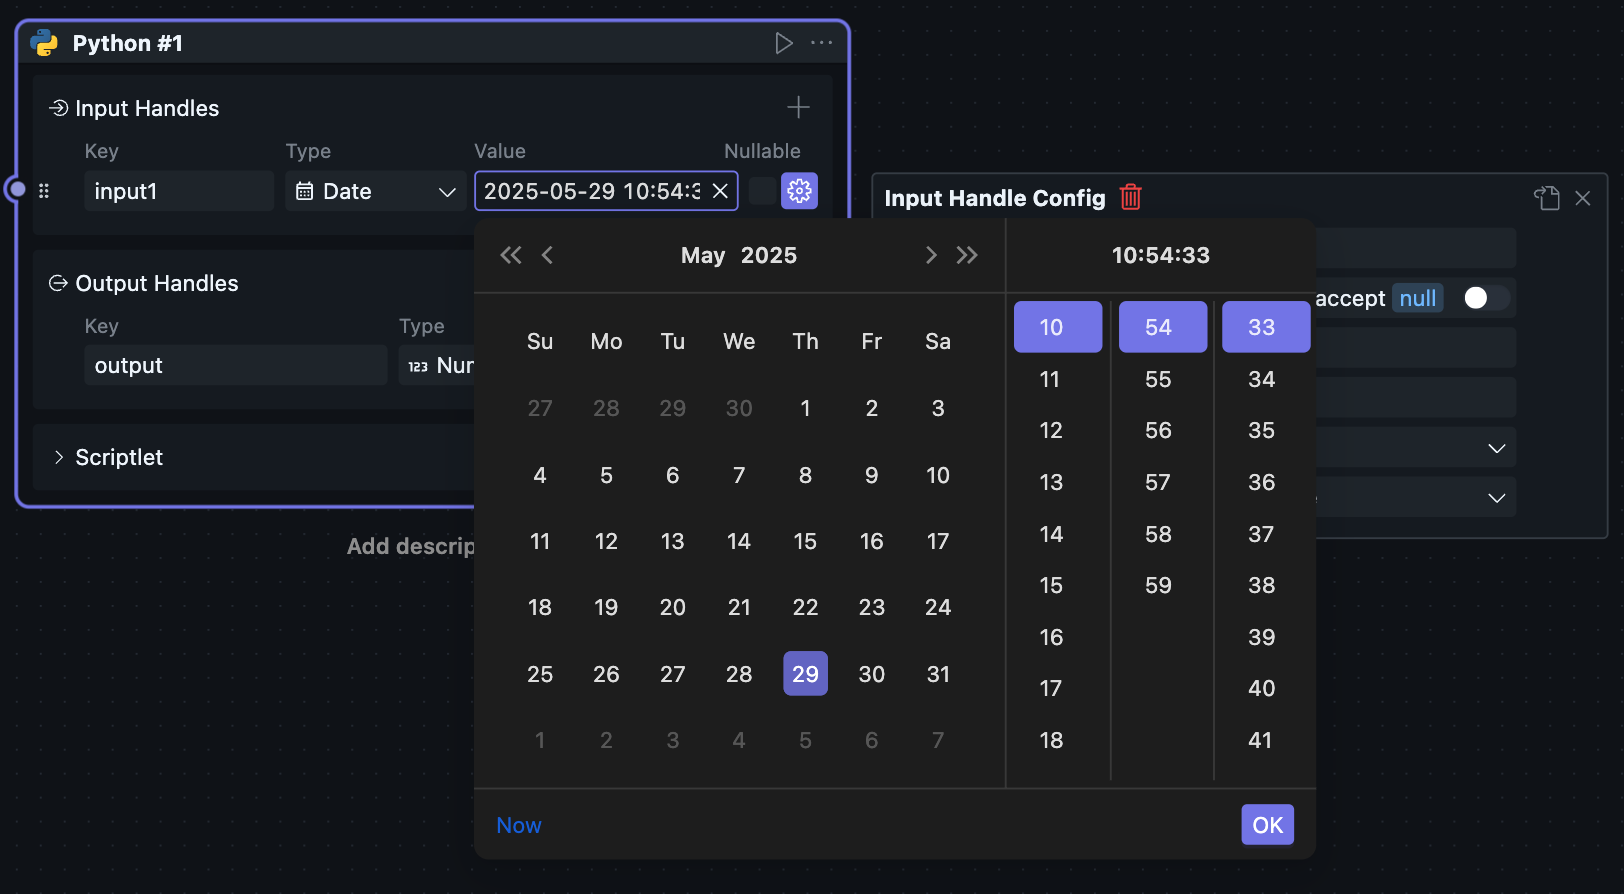
Date
Handle value is date format string.
Date format is 'YYYY-MM-DD hh:mm:ss'
Sub-configuration items can select date / time / date-time, corresponding to date only, time only, and date plus time respectively. Different options will cause changes in the selection Handle.
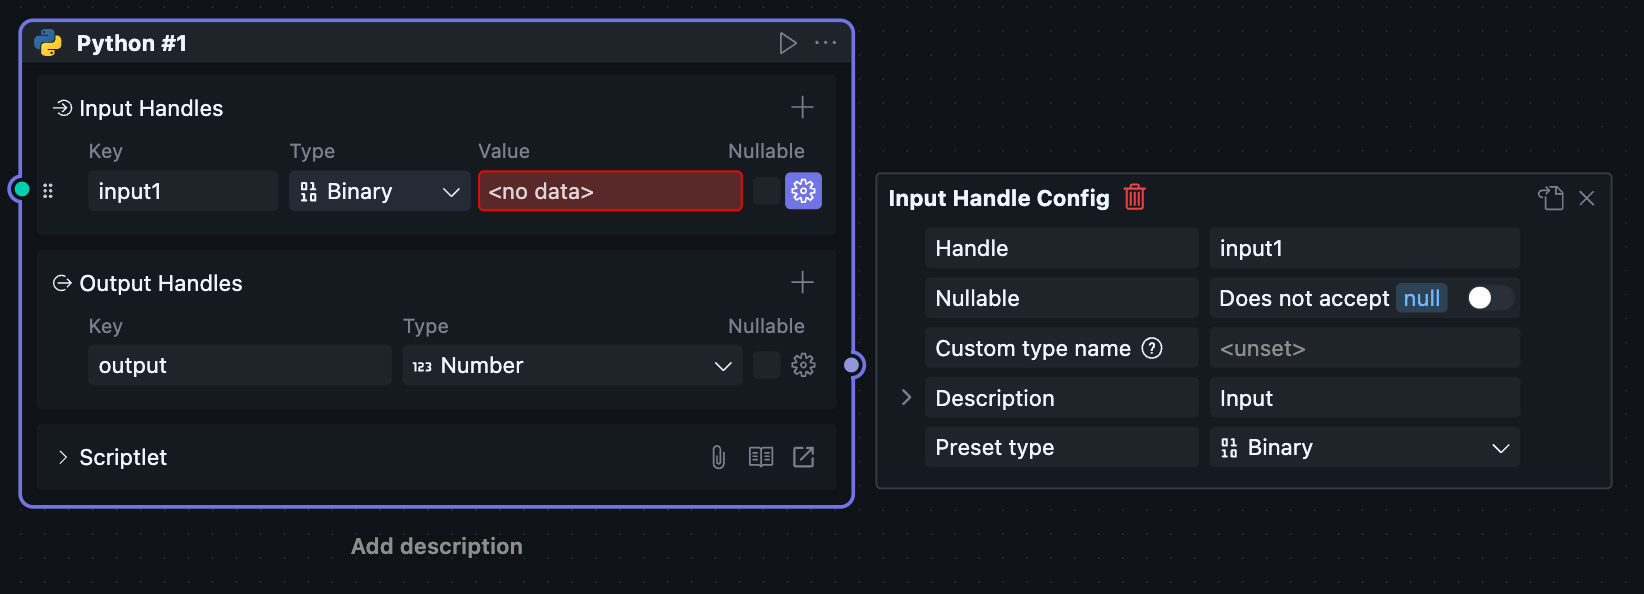
Binary
Handle value is binary type.
Although this type of value can be serialized, it cannot be meaningfully displayed, so there's no corresponding representation and configuration in the Handle. This type of Handle can only be connected and cannot set values through data input fields.
Can be used for special scenarios, such as upstream reading a file and passing it to downstream, or upstream outputting memory data to downstream. Downstream decides whether to serialize the binary or store it as a file.
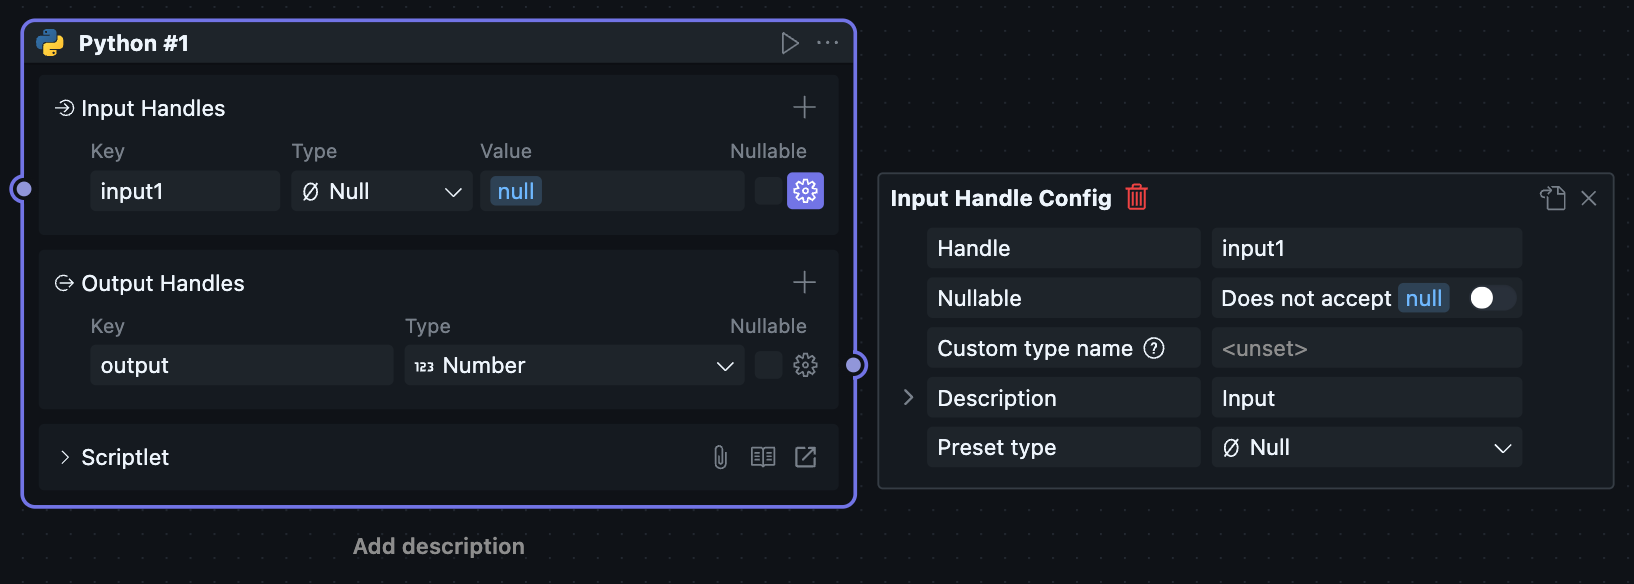
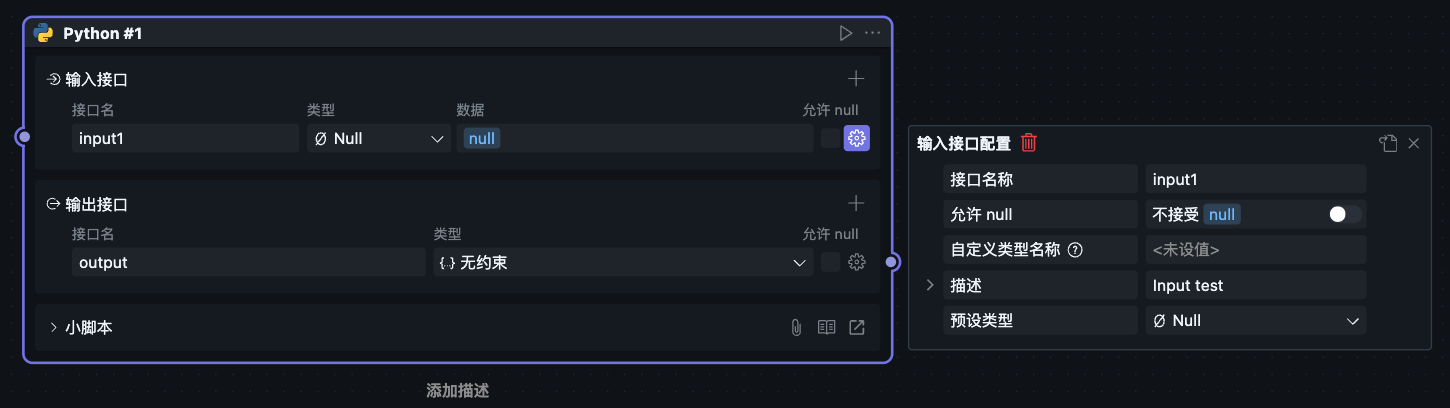
Null
Handle value is fixed as null(for Node.js) / None(for Python) value.
After type selection, no other type values can be set, generally used for debugging and other special scenarios.
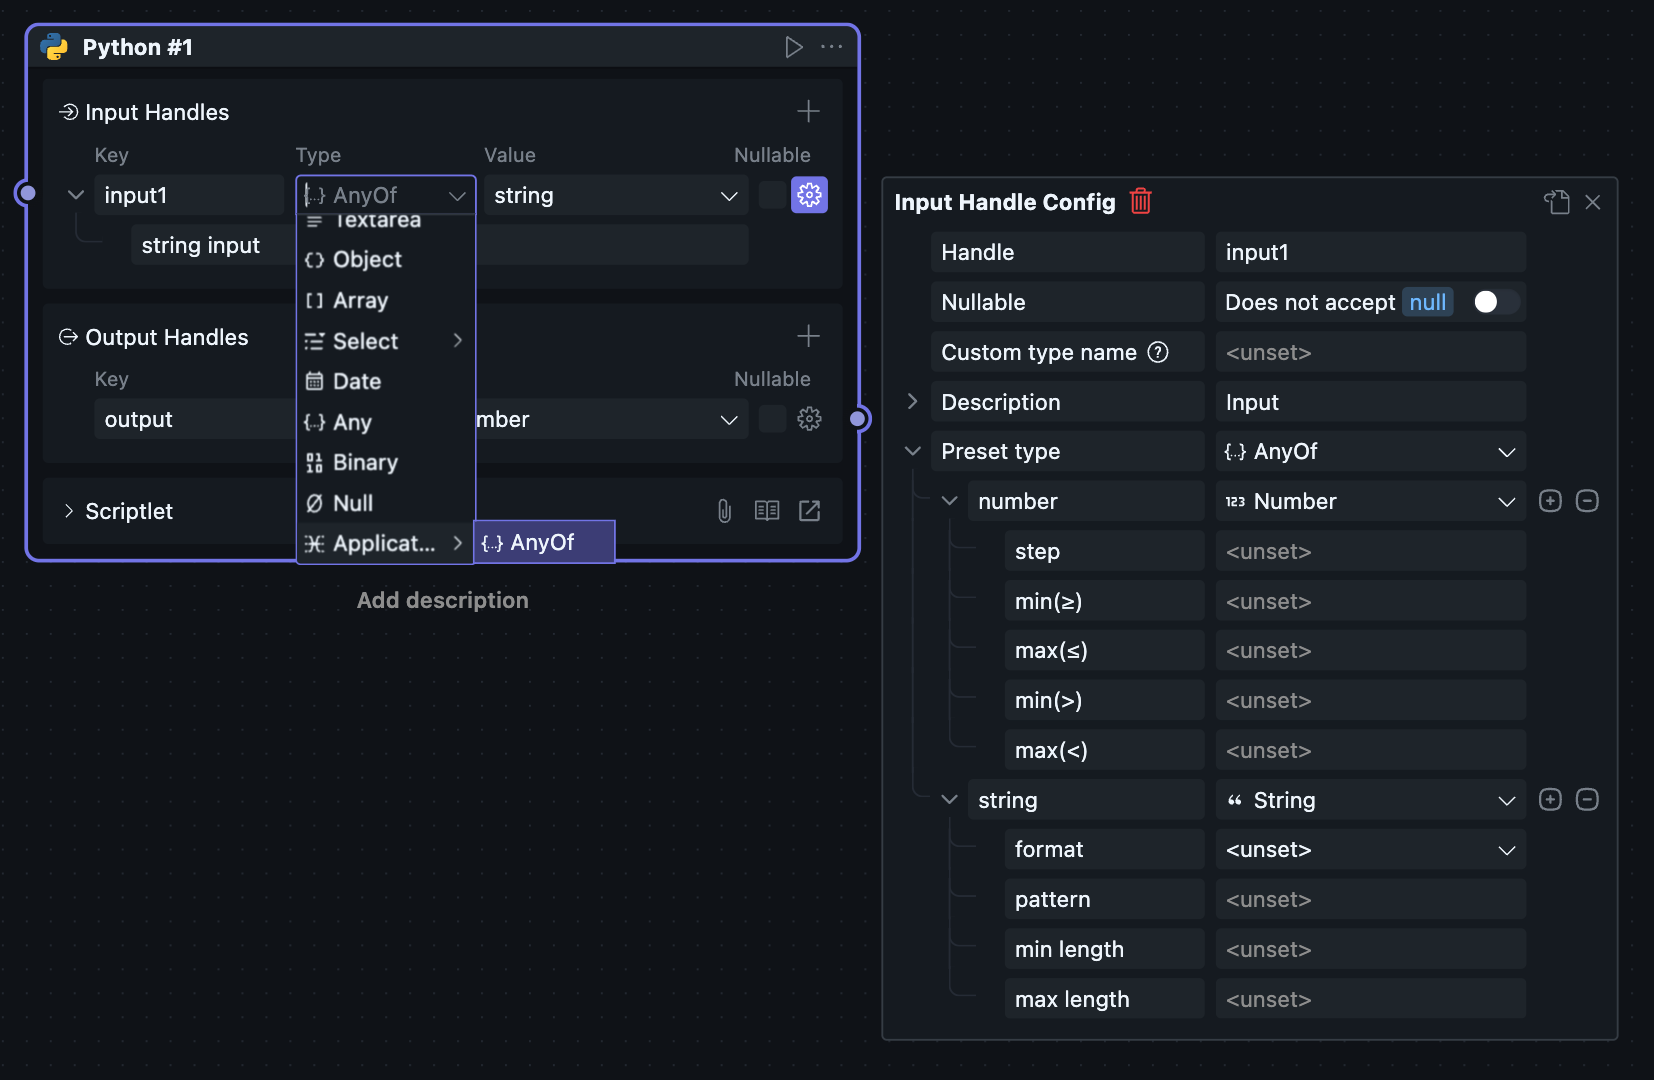
Applicators
Handle value needs to meet set applicator conditions.
Currently supported applicator is Any one, meaning Handle value only needs to meet any one of the conditions.
After selecting applicator, you need to configure conditions to be met in sub-configuration items. For example:
Configure condition 1 type as number, condition 2 type as string, then input values that are numbers or strings are both legal.
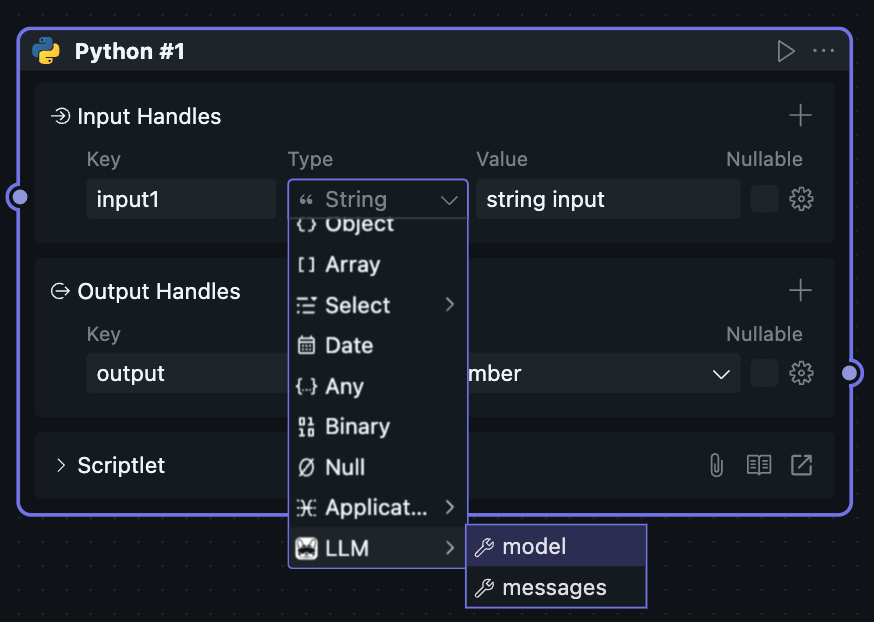
LLM
A special Handle type providing two sub-options: model / message.
This Handle type provides users with a series of parameters convenient for using AI models in code.
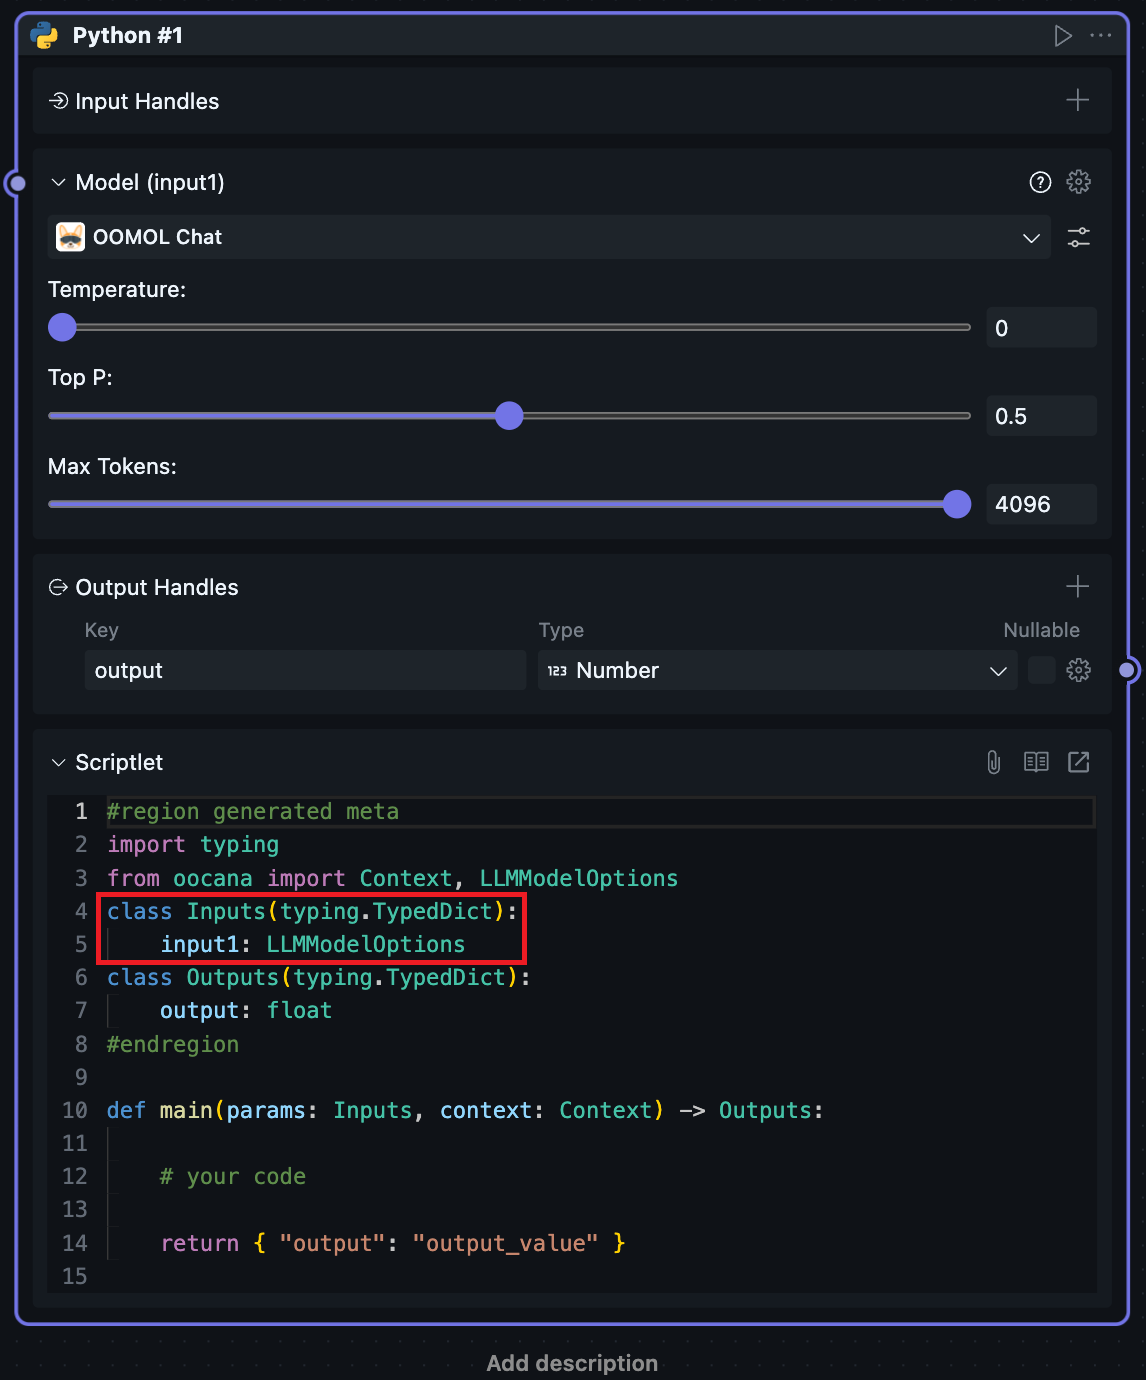
When selecting model, the input Handle will be converted to an AI model selection Handle. This Handle cannot be connected, and input values are fixed to user-selected and configured model parameters.
After selecting model, you can see the output Handle type changes. Users can now get model parameters configured in the Handle through the input Handle.
Users still need to create model invocation clients themselves to integrate AI in code. This Handle only provides configurable parameters to allow Blocks to modify parameters through the Handle during use and take effect, avoiding code modification.
When selecting message, the input Handle will be converted to AI prompt input. This Handle cannot be connected.
After selecting message, you can see the output Handle type changes. Users can now get prompt parameters configured in the Handle through the input Handle.
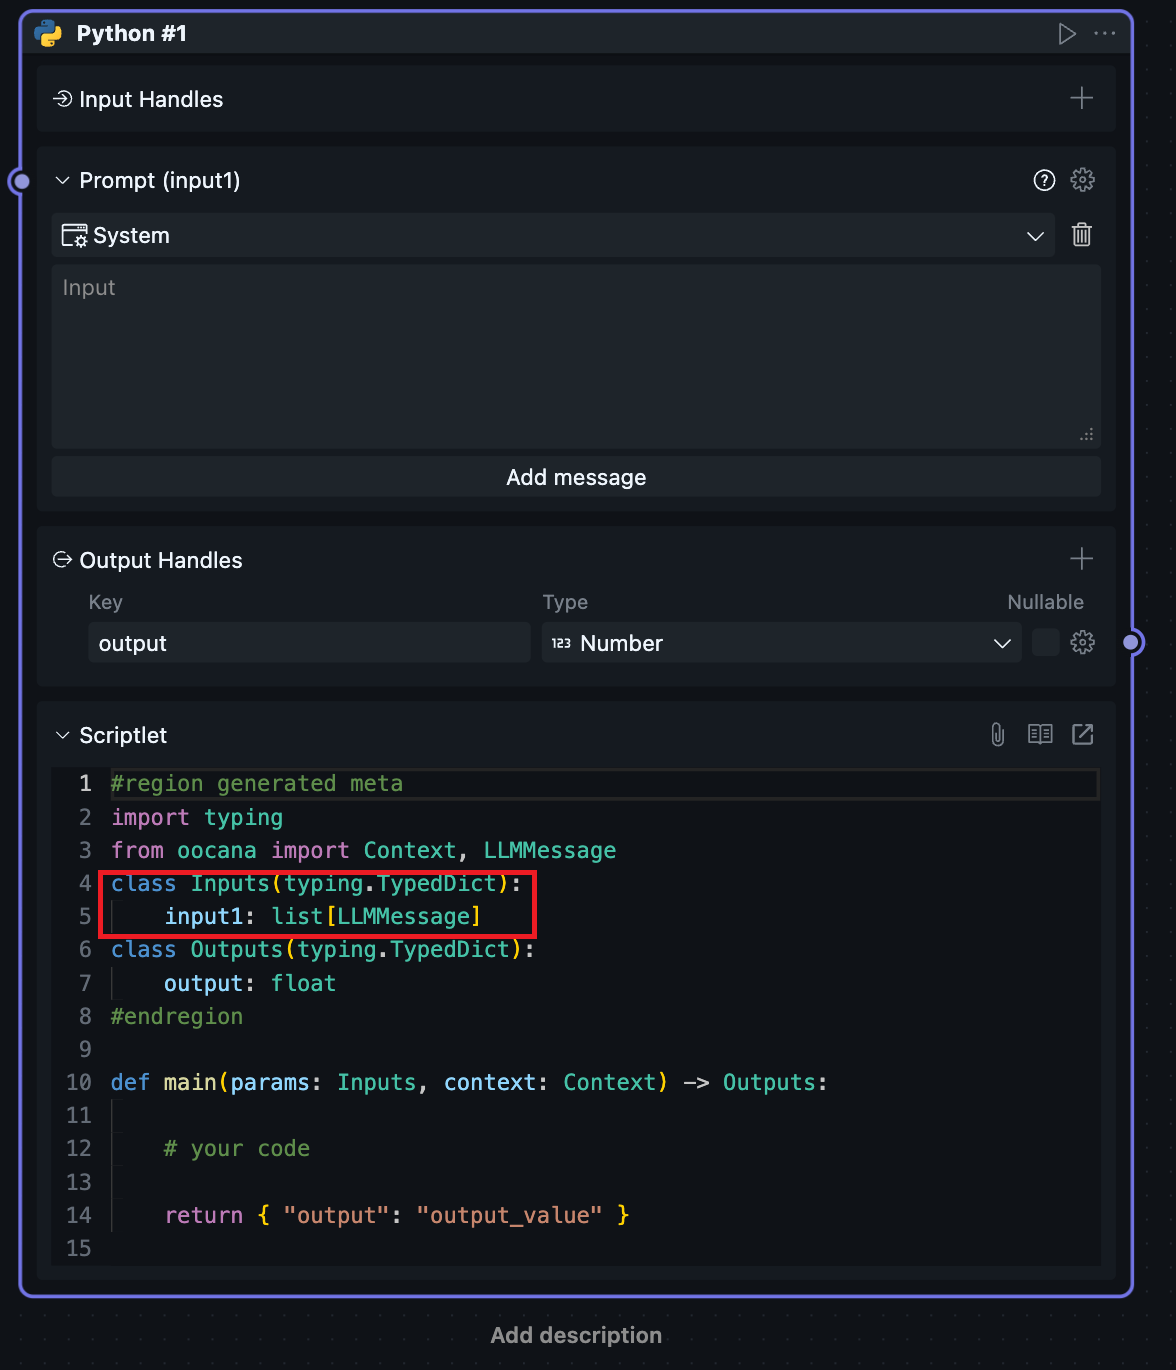
Users can configure multiple prompts on input Handles.
When users want to change LLM type input Handles back to normal Handles, they need to select other types in the Handle configuration panel:
JsonSchema
When users are not satisfied with Handle constraint conditions created on the page, they can edit the Handle's JsonSchema constraint file themselves. Click the toggle button in the upper right corner of the configuration panel:
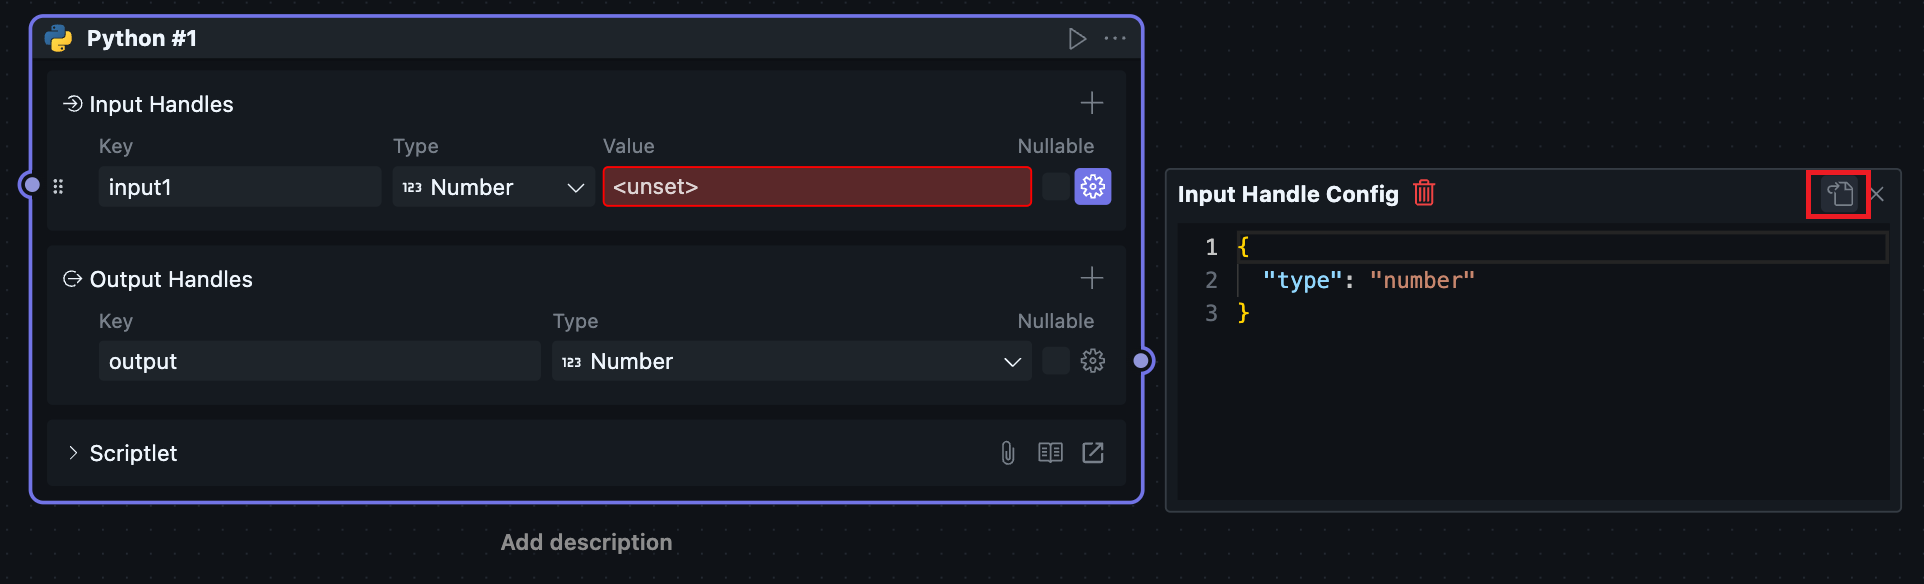
You can switch to JsonSchema editing mode.
JsonSchema modifications will be reflected in the Handle configuration panel as much as possible, and configuration panel changes will also be reflected in the JsonSchema editor.
Quick Create Node
Users can drag directly from input or output Handles to any blank area to quickly create new Nodes.
Handle Order
When hovering over an Handle, you can see buttons on the left side of the Handle. Drag to adjust Handle order.